


READ AND DOWNLOAD HERE FREE
TOPIC 1: INTRODUCTION TO CHEMISTRY
Introduction To Chemistry
When
you were in primary school, you used to learn science as a single
subject. At this level of study, the subject will be broken up into
three related subjects, namely Chemistry, Biology and Physics. The three
subjects are closely related. You will require the knowledge of one
subject to study the other. For example, you will apply the knowledge of
chemistry to study different chemical reactions that take place in the
body for studying biology of the human body, etc. Likewise as a
biologist, you will need the knowledge of physics to study movements of
different limbs of the body, etc. Therefore, these few examples show how
the three subjects are interdependent. Chemistry is usually studied
along with other related subjects such as biology, physics, earth
sciences and mathematics. A person studying science is called a scientist. A scientist specialized in the study of chemistry is called a chemist.
The importance of chemistry in life
Areas Where Chemistry is Applied
Mention areas where chemistry is applied
In
everyday life, we need different substances to meet our basic human
needs like food, shelter, clothing, comfort and health. Application of
chemical knowledge enables the production of different materials and
products that we need to live better.
Examples
of these materials, as mentioned early, are (paraffin), sugar, common
salt, soft drinks, medical drugs (medicines), toothpaste and plastics.
Others are spirits, wines, shoe polishes, cement, baking soda, petrol,
diesel and cosmetics (soaps, body oils and lotions, body and hair
creams, etc)
All
these materials, among others, are made by applying chemical processes.
They are needed for a better living. Can you mention more materials
made through chemistry knowledge?
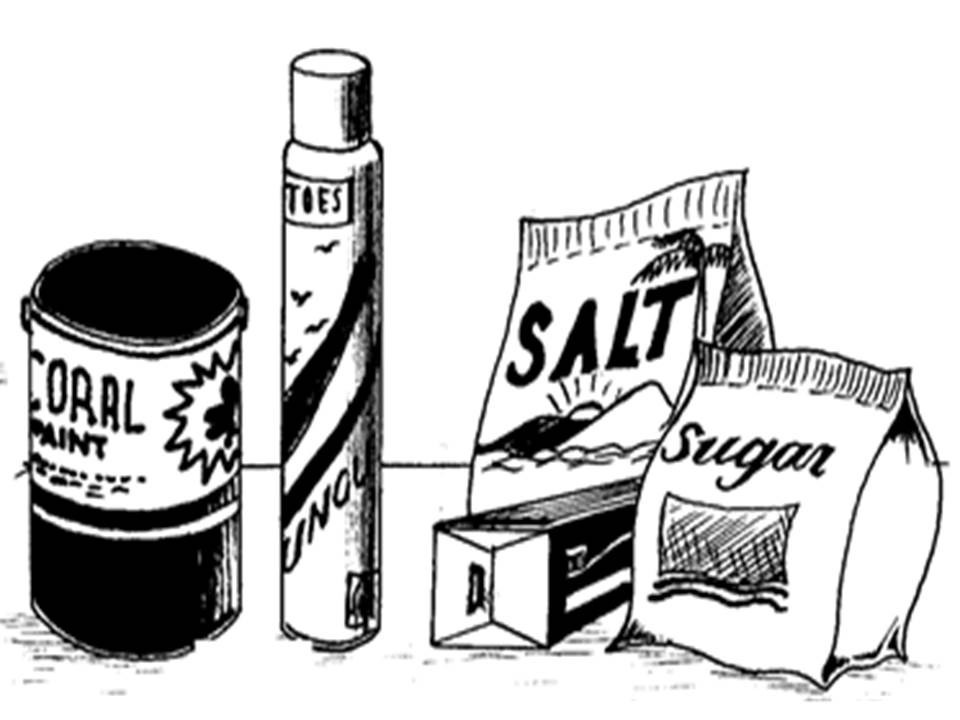
Some materials made by application of chemistry
Nature
is made of materials that may be useless, less useful and even harmful.
There are also things that are very useful to our lives. Through
chemistry, we are able to transform (change) various materials
chemically or physically into forms or products that are more useful to
man
For example, most laboratory chemicals you use at school are prepared from minerals that are mined from the rocks in the earth.
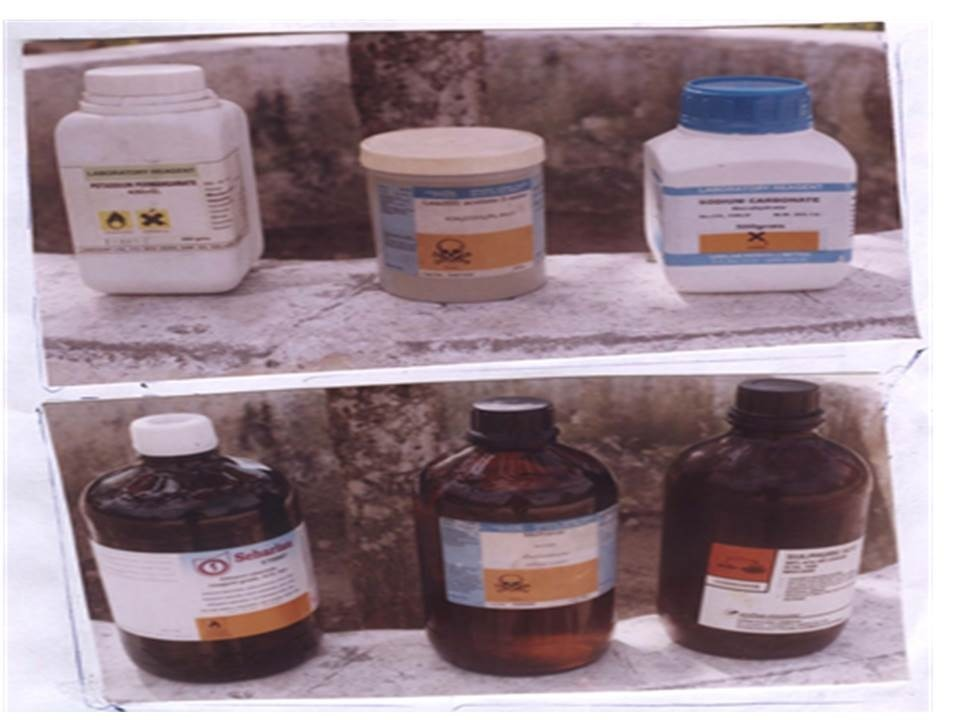
Laboratory chemicals
Man
cannot use most substances unless they are transformed into products
that are more useful. Limestone lying idle in earth is useless until it
undergoes deliberate physical and compositional transformation into
cement. The cement is used for construction of buildings, roads, bridges
and many different structures.
We
also need to change different mineral ores through a number of
processes into useful substances such as steel, aluminium, tin, etc. Man
has learned how to change harmful substances into useful products since
the long ago.

Common salt may be made from twohazardous substances–hydrochloric acid and sodium hydroxide.
Chemistry
is all around us. We often use chemical products and engage ourselves
in chemical processes more than we can tell. Look at the picture below.
This is an example of a chemical activity in which we can engage ourselves without knowing.
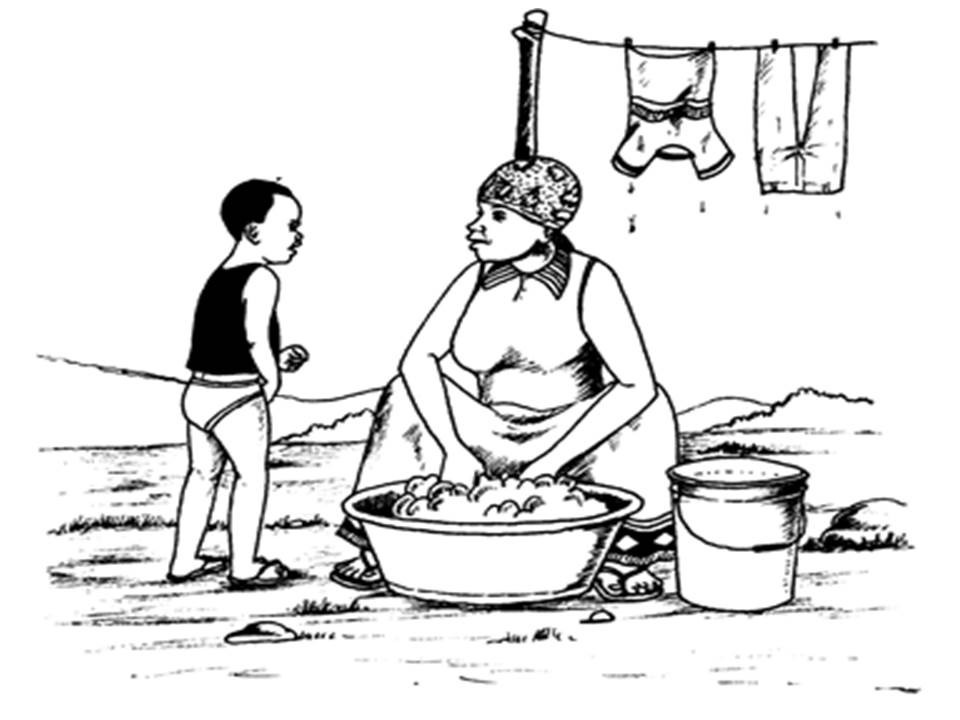
A woman washing clothes
Many
items we use at school, home and industry are made by applying chemical
processes. The soap we use to wash our clothes and clean our bodies is
made from animal fat and an alkali. Many items are made from plastic.
Many kinds of plastics are made from crude oil. What items are made from
plastics in your home? Soft drink bottles are made from glass. The
major component of glass is sand. Glass is made by mixing sand with
metal oxides in a furnace at high temperatures. Some clothing is made
from natural fibers such as cotton or silk.
Other fabrics like polyester and nylon are made from chemicals found in coal and crude oil. What are your clothes made of?
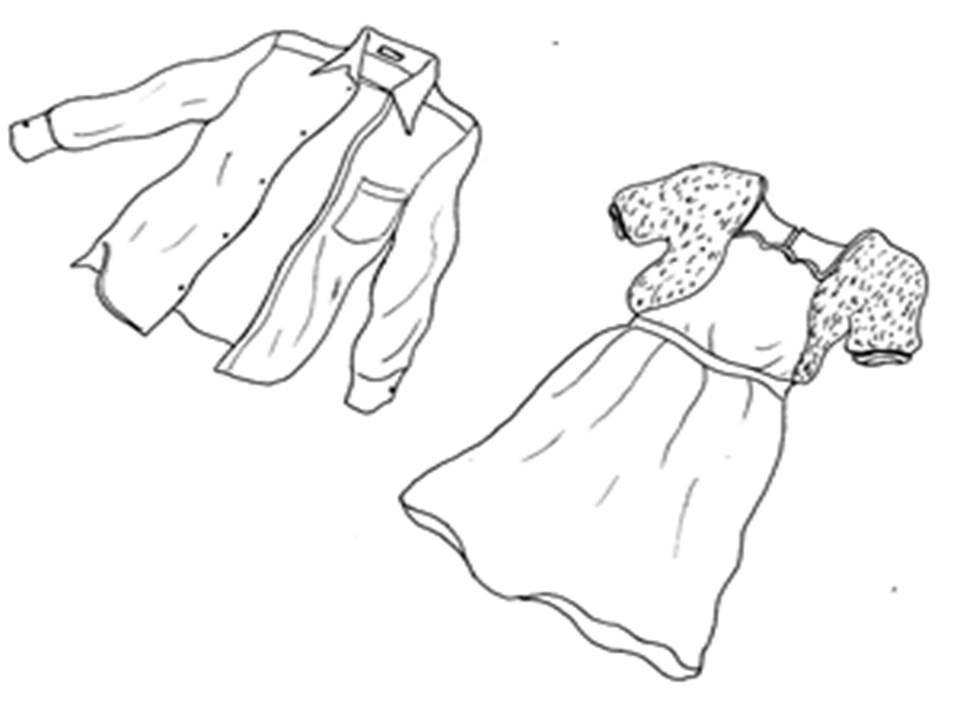
Clothes made from cotton fibres
Man
has used medicines extracted from plants and animals since the
beginning of time. For example, cinchona tree contains quinine, which
has a bitter taste. Quinine was and is still used for treatment of
malaria. Penicillin is extracted from a fungus called penicillin.
Nowadays, it is possible to make chemicals that have the same effects as
naturally occurring drugs.
This
forms the basis of the pharmaceutical drugs industry. What medicines
extracted from plants and animals are used in your school or local
dispensary?
Injection drugs and vaccines are made from plant or animal extracts
Apart
from clothing, it is a tradition to put on shoes and other attire.
Rubber shoes are made from rubber. Rubber is a sticky milky fluid
obtained from certain tropical trees. Skin shoes and handbags are made
from skins and hides of animals. The process of converting these raw
materials into the items mentioned above involves chemistry knowledge.
What other items made by chemical processes do you know?

Skin shoes
Sustainable
crop and animal production is also enhanced by application of chemistry
knowledge. The use of chemicals in agriculture is inevitable.
Fertilizers, insecticides, acaricides, herbicides (weed killers) have
and are still playing a good role in agricultural and animal production.
In some ecological zones, in order to get good harvest, fertilizer,
herbicide and insecticide application is necessary. The same case
applies to animal production. As regards to control and prevention of
tick-borne diseases, application of different acaricides is often
stressed. Also is the use of different drugs to treat internal parasites
such as worms, and vaccines to prevent certain diseases.
The Importance of Chemistry in Daily Life
State the importance of Chemistry in daily life
There
are a number of reasons for studying chemistry. If you ask someone to
tell you the reason for studying chemistry, he/she will give reasons
based on how the subject touches him/her. However, there are general and
universal reasons as to why we should devote our valuable time and
energy to the study of chemistry. In general, we study chemistry because
it helps as to understand:
- the composition of materials around us;
- the nature, properties and behaviour of these materials;
- why and how materials behave as they do;
- how a new material, based on the known properties of its allies or counterparts might behave;
- how to make new materials which will be useful to us; and
- how to extract and use materials from the earth to improve our welfare.
In economic and occupational terms, we can say that the knowledge of chemistry helps us:
- to produce professionals in different disciplines such as pharmacy, engineering, medical and natural science professions; and
- make items, goods and materials for sale such as chemical laboratory equipments and reagents, medicines, rubber, cement, paints, steel, plastics, etc. What other materials do you think can be included in the list?
Therefore,
we can summarize that the study of chemistry is important for survival,
development and welfare of man as well as sustainable production of
crops and animals.
TOPIC 2: LABORATORY TECHNIQUES AND SAFETY
A
laboratory is a room or building specially designed for conducting
various scientific experiments. An appropriate school laboratory has the
following features:
- a room with enough space for carrying out scientific experiments;
- a store for keeping laboratory apparatus, chemicals and reagents;
- an office for laboratory technician to sit in and design scientific experiments;
- enough ventilation to let in fresh air and light;
- wide doors and several exits for emergency evacuation in case of an accident; and
- a wide table in front of the laboratory room, fitted with sinks for experiment demonstrations by the teacher or technician.
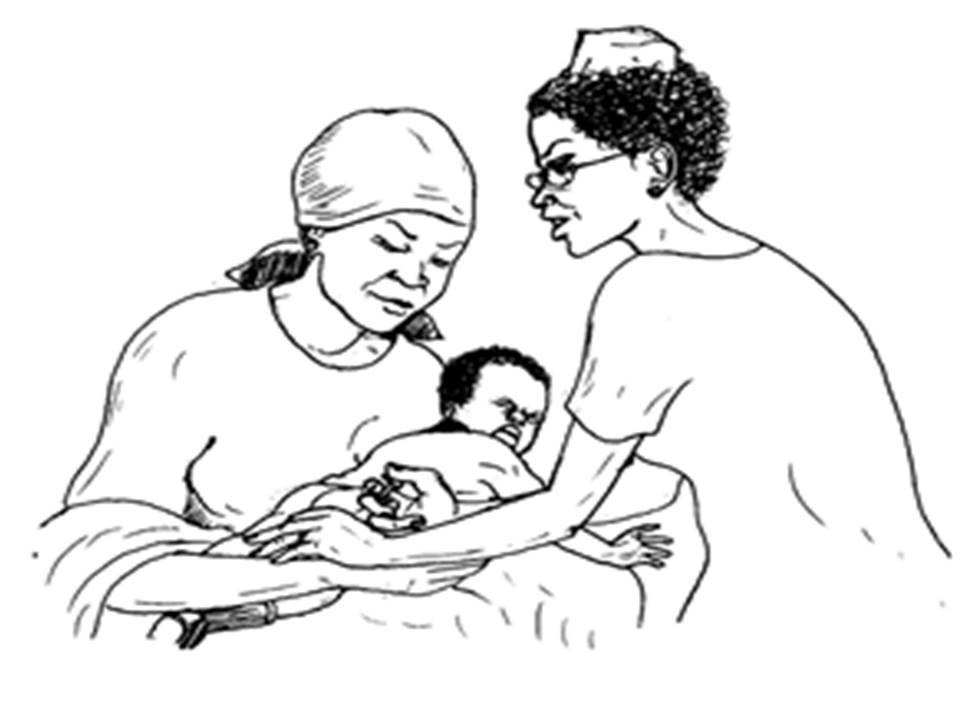
First aid and first aid kit
FIRST AID
First
aid is the help given to someone who is injured or sick before the
victim gets further medical assistance. This help can be given by any
person regardless of his/her knowledge in a medical profession.
Whenever
an accident occurs, something must be done immediately to help and save
life of the victim. You must always be ready to give a hand to a victim
whenever an accident occurs close to you. To give aid effectively and
successfully, one must have elementary knowledge on how to assist
different victims. If you do not know how to help a certain victim, you
can ask someone to assist instead. Do not engage yourself in assisting
if you actually do not know where to start. You may find yourself
worsening the situation of the victim unknowingly. However, this should
not be taken as an excuse for failing to help. Always be ready to render
some kind of help. First aid helps to:
- relieve pain and bring hope to the victim.
- prevent permanent disability
- prevent the victim’s condition from getting worse
- reduce the possibility of death.
- shorten recovery time
Possible Causes of Accidents in a Chemistry Laboratory
Identify possible causes of accidents in a chemistry laboratory
Accidents
may occur in a school laboratory if utmost care is not taken into
account. Accidents in the laboratory are mainly cuts on parts of the
body such as hands, fingers, legs or head. Others are burns from flames,
scalds from boiling fluids, bruises and grazes due to accidental
falling on a slippery floor.
Some possible causes of accidents in the laboratory include:
- Failure to follow the correct experimental procedures for example, pouring water into an acid instead of pouring an acid into water as the rule is.
- Neglecting some laboratories rules such as ignoring to wear protective gears, tasting the chemicals, eating or drinking while in the laboratory, etc.
- Failure to adhere to proper conduct in the laboratory like running unnecessarily and conducting experiments without your teacher's or technician's permission and guidance.
- Improper use or handling of laboratory equipment and apparatus when conducting experiments, which could lead to breakage and in turn cause cuts, bruises, grazes, etc.
- A slippery laboratory floor which can cause fractures, cuts, bruises, grazes, etc
- Accidental spillage of chemicals on body parts such as hands, face, eyes, etc, could lead to burns and damage.
- Poor ventilation in the laboratory may cause suffocation (due to inadequate oxygen supply) and poisoning (by inhaling poisonous gases produced when experimenting).
- Improper disposal of chemical wastes may result in explosions, burns or even fires.
- The leaking of gases from taps or cylinders may cause fires or even explosions.
- Use of wrong reagents due to incorrect labeling of chemicals or use of reagents or chemicals that have expired may cause burns, poisoning or damage to apparatus or equipment.
- Inadequate prior information or knowledge on procedures and hazards associated with certain practical activities or reactants may result in burns, poisoning or explosions.
- Loose or improperly plugged electrical appliances may cause electric shock, especially when touched with wet hands and during fixing of sockets.
In
general, it can be concluded that most laboratory accidents are a
result of negligence and carelessness of experimenters. It is also due
to failure to follow the laboratory rules and general safety measures.
The Items Found in a First Aid Kit
Name the items found in a first aid kit
A
First Aid Kit is a box in which first aid chemicals, tools and
instruments are kept. In the laboratory, the box is usually kept in a
place where it can be easily reached in case of an accident, preferably
on the wall.
Each
student must be familiar with the tools and chemicals kept in the kit
and learn how to use them to provide first aid to a victim.

First aid kit and its contents
How Each First Aid Kit Item is Used
Demonstrate how each first aid kit item is used
The table below shows types of chemicals found in a First Aid Kit and their functions.
| Tool/chemical/item | Function |
| First aid manual | Contains guidelines on how to use the items in the first aid kit |
| Sterile gloves | Worn on hands when attending bleeding cuts or wounds to avoid infecting wounds and to prevent direct contact with the victim’s body fluids |
| Sterile dressing | Stops bleeding |
| Antiseptic agent | Cleaning and disinfection of wounds, cuts, bruises, grazes or blisters |
| Soap | Washing hands, wounds and equipment |
| Antibiotic ointment | Prevents infection on cuts and bruises in or near the eye |
| Burn ointment | Applied on burns to prevent infection |
| Petroleum jelly | Soothing broken skin |
| Plaster or adhesive bandage | Covering small wounds or cuts |
| Sterile gauze | Covering wounds to protect them from dirt or germs |
| Eye wash solution | Flushing the eyes or as a general decontaminant |
| Thermometer | Recording body temperature |
| Antibiotic towelettes or cotton wool | Cleaning and drying cuts and wounds |
| Iodine tincture | Dressing fresh cuts and bruises |
| Pain relieving drugs such as aspirin, paracetamol, panadol, etc | Relieving mild pains |
| Liniment | Reducing muscle pain |
| Mild antibiotics | Treating mild bacterial infections on the skin, ear, nose and mouth |
| Gentian violet solution | Applied on minor wounds and treatment of serious heat wounds |
| Hydrogen peroxide solution | Cleaning wounds |
| Methylated spirit (70% alcohol) | Cleaning cuts and bruises |
| Bandages | Dressing wounds and cuts, and immobilizing injured limbs |
| Scissors or razor blade | Cutting dressing materials |
| Dental kit | Treatment of broken teeth, loss of crown or filling |
| Safety pins (small and big) | Splinter removal and securing triangular bandage slings |
| Tweezers | Splinter or stinger removal |
| Resealable oven bag | Container for contaminated articles |
| Moleskin | Applied to blisters or hot spots |
| Triangular bandage | Used as a sling, towel or tourniquet |
| Boiled, clean water | Washing hands and drinking |
| Nasal spray decongestant | Nasal congestion from colds or allergies |
| Torch | Source of light |
| Whistle | Blown to call for help |
The Items in a First Aid kit to Provide First Aid to an Accident Victim
Use the items in a first aid kit to provide first aid to an accident victim
First aid procedures
Sometimes
accidents may occur in the laboratory due to some reasons or the other.
Whenever an accident occurs, one must be ready and prepared to assist.
The following are some of the health problems that may require first aid
and the procedure to follow when providing help.
Bleeding
Bleeding
is the loss of blood from the body and usually occurs from a visible
wound. Bleeding may be external or internal. It may from artery, vein or
capillary. Bleeding may be severe or light. Excessive loss of blood may
cause death.
(a) Internal bleeding
Signs and symptoms of internal bleeding include the following:
- Bruised, swollen, tender or rigid abdomen
- Bruises on chest, neck, legs or signs of fractured ribs
- Vomiting or coughing up blood.
- Wounds that have penetrated the skull, chest or abdomen
- Bleeding from body cavities such as the ears, nose, rectum or vagina
- Abdominal pulse and difficulty breathing
- Cool, moist skin
- Fractures
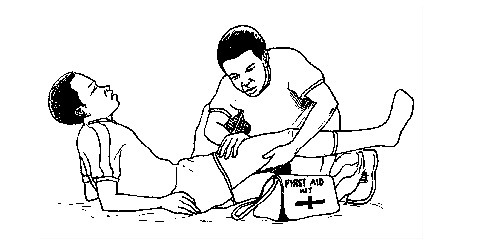
Procedure
- First aid in the field for internal bleeding is limited. If the injury appears to be a simple bruise, apply cold packs to slow down the bleeding, relieve pain and reduce swelling.
- If you suspect more severe internal bleeding, carefully monitor the patient. Be prepared to administer CPR if required (and you are trained to do so).
- Seek medical advice immediately if the situation seems to be worse.
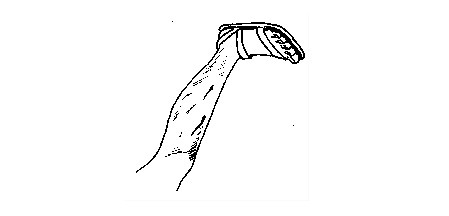
(b) Severe bleeding
Procedure
- Severe bleeding with blood oozing out rapidly must be stopped at once. This can be done by applying direct pressure to the wound. Use a dressing if available. If it is not available, use a rag, towel, piece of clothing or your fingers alone. If the wound is large, press the edges of the wound together but firmly. However, this should be done only if there is no fracture.
- Lay the victim down in a comfortable position.
- If the wound is on a limb, and provided it is not fractured, raise the wound above the level of the heart. Then continue to apply direct pressure. This should be done only if bleeding continues and if it does not cause pain.
- If bleeding still cannot be controlled, the next step is to apply pressure at a pressure point. For wounds of the arms or hands, pressure points are located on the inside of the wrist (radial artery-where a pulse is checked) or on the inside of the upper arm (brachial artery). For wounds of the legs, the pressure point is at the crease in the groin (femoral artery).
- When bleeding stops, clean the wound carefully and thoroughly with a suitable disinfectant. Do not remove any objects stuck in the wound, as this would lead to more bleeding.
- Place sterile gauze on the wound and press it down firmly. Cover it with a soft material and hold it in position using a firm bandage. After the bandage is in place, it is important to check the pulse to make sure blood circulation is not interrupted. A slow pulse rate, or bluish fingertips or toes signal a bandage may be hindering blood circulation.
- Seek medical help immediately.
Important:
Once pressure is applied, keep it in place. If dressings become soaked
with blood, apply new dressings over the old dressings. The less a
bleeding wound is disturbed, the easier it will be to stop the bleeding.
(c) Light bleeding
Procedure
- Place the victim in a comfortable resting position.
- Elevate the injured part while applying pressure. This should be done only if the wound is on a limb and you do not suspect a fracture.
- Gently and thoroughly clean the wound using water and antiseptic or common salt solution.
- Cover the wound with sterile gauze or clean dressing dipped in iodine solution.
- Dress and bandage the wound
- Take the victim to hospital if bleeding still continues.
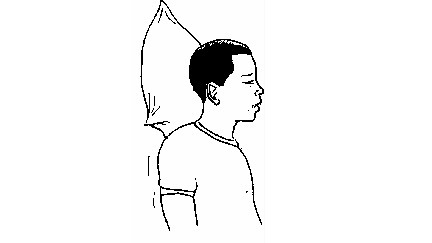
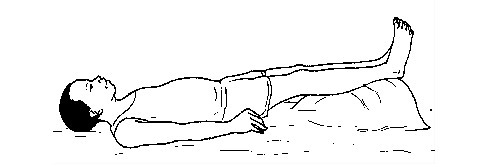
(d) Nose bleeding
Bleeding
usually occurs near the tip of the nose. The bleeding may be a result
of high blood pressure, rheumatic fever, or injury. Nose bleeding is
also likely to occur at high altitude because of low atmospheric
pressure or extreme coldness.
nose-bleeding victim

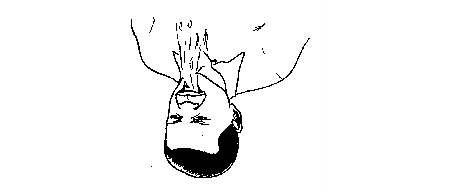
Procedure
- Let the victim sit calmly. This makes the heartbeat to slow down and hence reduce bleeding.
- Loosen clothing around the neck and chest.
- Let the victim sit upright and lean the head forward slightly. By remaining upright, the victim reduces the blood pressure in the veins of his or her nose. This discourages further bleeding. Leaning forward will help the victim avoid swallowing blood, which can irritate his or her stomach.
- Have the victim pinch his or her nose, to keep nostrils shut, using thumb and index finger. Ask the victim to breath through the mouth. Let him or her continue pinching for a few minutes.
- Apply cold, wet compression over the nose, face and at the back of the victim’s neck.
- When bleeding stops, gently clean the nostrils.
- If bleeding does not stop after 20 minutes, take the victim to the hospital immediately.
- To prevent re-bleeding after bleeding has stopped:
- Ask the victim not to pick or blow the nose and not to bend down until several hours after bleeding.
- Let the victim keep his/her head higher than the level of his/her heart.
- If re-bleeding occurs:
- Ask the victim to blow out forcefully to clear the nose of blood clots. Spray both sides of the nose with decongestant nasal spray.
- Pinch the nose as described above and seek medical help.
nose-bleeding victim with his head leaned forward.
Suffocation
Suffocation
is a condition in which the lungs are not getting enough oxygen,
causing difficulty in breathing. In such cases, foams can also appear in
the mouth and nostrils. If suffocation is complete (no air at all
reaches the lungs), the lack of oxygen and excess carbon dioxide in the
blood will cause immediate loss of consciousness. Though the heart
continues to beat briefly, death will follow in a matter of minutes
unless emergency measures are taken to get breathing started.
Suffocation
can be caused by drowning, electric shock, gas or smoke poisoning,
choking, asthma, severe infections of the throat or other causes.
Procedure
- Remove the cause of suffocation or remove the victim from the cause of suffocation. Loosen tight clothing around the neck.
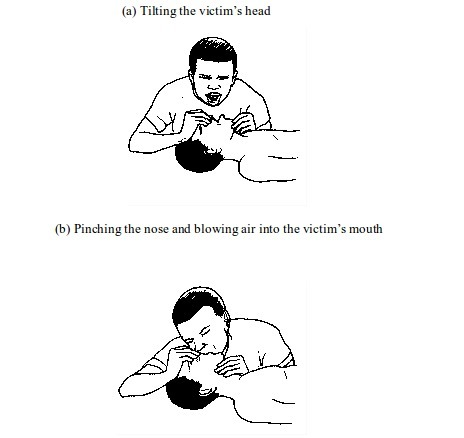
- Make sure the victim’s airway is open for air to reach the lungs. This can be achieved by laying the victim on his or her back. Then, with one hand on the victim’s forehead and the other on the chin, tilt the head backwards, to open the airway. Tilt the head until the chin points straight upwards. If the airway is blocked by fluid or solid, remove it.
- Administer cardiopulmonary resuscitation (CPR). This involves blowing air into the victim’s mouth (mouth-to-mouth breathing). To do this, pinch the nose and close up the mouth. Take a deep breath and then blow hard into the victim’s mouth. Watch the rise in chest and repeat the procedure until the victim’s breathing is restored. In case the person does not respond, go for chest compressions.
- Compressions can be done by placing the palm of one hand in the space between the nipples and the other hand over it and pushing the chest by using your upper body weight. Care should be taken to prevent chest injury or fracture. Two compressions can be given every second or hundred per minute. After thirty compressions, go for mouth breathing again. Repeat the procedure until natural breathing is restored.
- Keep the casualty warm using a light blanket.
- Take the casualty to the hospital immediately.
figure.
Choking
Choking
occurs when food or a foreign object blocks the upper part of the
windpipe. This interferes with normal breathing. The signs of this
problem include difficulty in breathing and speaking. Have you ever been
with a person who is chocking? Did you know what to do?
When attending a person who is chocking, first notice whether the person can talk, breathe or cough. Caution: Do not try to slap the person on the back. The slapping may only cause the food to become more deeply lodged in the airway.
Procedure
- Ask the victim to cough up the object.
- If the object remains stuck, give firm but gentle taps between the shoulder plates.
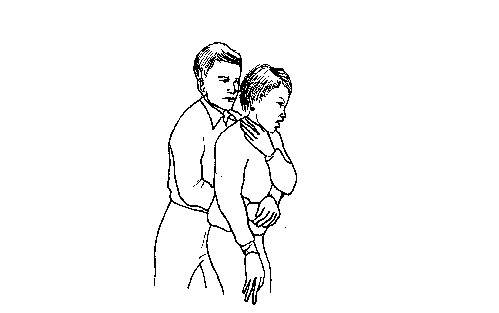
- If the object is still stuck, apply quick abdominal thrusts i.e. Heimlich manoeuvre as follows:
- Stand behind the victim and make him or her lean forward slightly.
- Put your arms around the person, placing your fist just below the breastbone. Grasp your fist with the other hand near the top of the victim’s stomach.
- Press your fist onto the victim’s abdomen. Give a series of quick, sharp upward and inward thrusts to dislodge the object.
Thrusting to dislodge the object
Poisoning
A
poison is any substance that can harm the body or seriously endanger
health when taken into the body. A poison may get into the body through
inhaling, swallowing, wounds or skin cuts or absorbed into the body in
other ways. Potential poisons include poisonous fumes (or gases),
laboratory chemicals or even medical drugs and medicines.
In
every household, there are different kinds of things that are
poisonous. Some are deadly even on a very small dose. Others may be more
or less harmless when taken in small quantities.
Examples of poisonous substances at home are kerosene, disinfectants, paints, medicines, artificial fertilizers, etc.
Some
signs and symptoms of poisoning are nausea, vomiting, abdominal cramps,
pain, difficulty breathing, diarrhea, and abnormal skin colour. Others
are breath that smells like the chemicals, chemical burns, empty
medication bottles or scattered pills, sleepiness, confusion or other
unexpected signs.
Procedure
- Call for medical help immediately if the person shows one or some of the following signs: drowsy or unconscious; having difficulty breathing or has stopped breathing; uncontrollably restless or agitated.
- For the time being, find out what caused the poisoning, i.e. look for the poison and identify it.
- If the person has been exposed to poisonous fumes such as carbon monoxide, get him or her to where there is fresh air immediately.
- If the poison is in the eye:
- Wash the eye with a lot of clean water.
- Ask the victim to blink as much as possible.
- Do not rub the eye.
- If the person swallowed the poison:
- Remove anything remaining in the mouth
- Induce vomiting if the poison is not strong acid or alkali as these are corrosive substances. Non- corrosive substances include medicines and soaps. Vomiting can be induced by inserting your finger in the victim’s throat until the finger touches the epiglottis.
- Do not induce vomiting if the poison swallowed is corrosive. Corrosive substances include kerosene, bleach, detergent, laboratory acid, disinfectant or certain toiletries. If the suspected poison is a household cleaner or other chemical, read the label and follow instructions for handling accidental poisoning.
- Neutralize the poison by giving the victim plenty of milk to drink, an egg white or water.
- If the poison is on the skin:
- Remove any clothing from the affected part.
- Wash the affected area thoroughly with a lot of water.
- Do not apply any ointment.
- Make sure the person is breathing. If not, start rescue breathing and CPR.
Note: Take the poison container or any pills, pill bottle or pill blister pack with you to the hospital.
Shock
Shock
is a condition in which the body system fails to take enough blood to
the vital organs. If untreated, it can lead to permanent organ damage or
death. The vital organs include the heart, the lungs, the brain, the
kidneys and the liver.
Causes
Shock
may result from bad news, heatstroke, severe illness, blood loss,
dehydration, poisoning, severe burns, an accident or other causes.
Signs and symptoms
Various signs and symptoms appear in a person experiencing shock. They include the following:
- The skin becomes cool and moist. The skin, lips and fingernails may appear pale or grey.
- The pulse rate is weak and rapid. Breathing may be slow and shallow.
- The limbs may tremble and get weak.
- The eyes lack lustre and may seem to stare. Sometimes the pupils are dilated.
- As the shock develops, the victim may experience nausea and even vomiting. Eventually he or she may become restless, nervous, aggressive and finally conscious or unconscious. If conscious, the person may feel faint or be very weak or confused.
Procedure
- Control any cause of shock such as bleeding, etc.
- Lay the person down with his or her feet higher than his or her head (shock position).
- Loosen tight clothing, laces, belts and shoes.
- Turn the person on his or her side to prevent choking if the person vomits or bleeds from the mouth.
- Keep the person warm and comfortable if he/she feels cold. Cover the victim with a blanket or any heavy clothing.
- Seek treatment for injuries such as bleeding or broken bones.
- Administer CPR if the person does not appear to breath well, cough or even move.
- Seek medical help immediately.
The shock position
Electric shock
An
electric shock occurs when a person comes into direct contact with
electricity. Exposure to electricity may result in injury or even death.
Injuries may be burns, or physical injuries that result from being
thrown by the electric current.
Procedure
- Switch off the main switch immediately if possible.
- If not possible to put off the switch, detach the casualty from the source of electricity using a non-conducting object such as a dry wooden stick, cardboard, plastic or rope.
- Loosen any tight clothing, necklaces, bangles, etc.
- If the person is unconscious, apply mouth-to-mouth respiration (CPR) immediately.
- Treat for shock, burns, bruises or other injuries the victim may have sustained. Lay the victim down, and if possible, position the head slightly lower than the trunk, with the legs elevated (shock position).
- Take the person to the hospital immediately.
Caution
- Do not touch the person with your bare hands if he or she is still in contact with the electric current.
- Do not get near high-voltage electricity until power is turned off. Instead, call for help immediately.
- Do not move a person with an electrical injury unless the person is in immediate danger.
Bruises
A
bruise is an injury beneath the skin. Bruises can be identified by
pain, swelling or a mark under the skin. A bruise forms when a blow
(hard hit) breaks the blood vessels near the skin’s surface. This allows
a small amount of blood to leak into the tissues under the skin. The
trapped blood appears as a blue-black mark.
Procedure
- Wash the bruised part of the body.
- Apply a cold compress, such as a cloth dipped in cold water or ice wrapped in a cloth, to the injury. This helps reduce pain, swelling, and speeds up recovery.
- If the bruise is on a limb such as arm or leg and it covers a large area, keep the limb elevated as much as possible for the past 24 hours.
- After 48 hours, apply a cloth dipped in tepid water to the bruise for about 10 minutes, three times a day. This will help increase blood flow to the affected area and thus speed up healing.
Bruises under the skin
Vomiting
Vomiting is an involuntary ejection of the contents of the stomach through the mouth.
Possible causes of vomiting
- Allergic reactions
- Diseases e.g. malaria
- Physiological condition e.g. pregnancy
- Food poisoning
- Unpleasant smell or taste
- Drinking contaminated water.
- Inhaling poisonous fumes
- Over-eating.
Procedure
- Give the victim an oral rehydration drink or oral rehydration salt solution. You may also provide a lot of any clear fluids.
- Allow the person to have a complete rest.
- Take the victim to hospital if:
- Vomiting continues persistently.
- The victim vomits blood.
- The victim experiences high fever.
- The victim is very dehydrated. This will be observed when the mouth and skin become very dry.
A victim vomiting
Fainting
Fainting
is a sudden loss of consciousness caused by a temporary fall in the
supply of blood and oxygen to the brain. Sometimes it can be caused by
emotional shock or prolonged standing. The person feels weak, sweats and
then falls down.
Procedure
- Loosen or remove any tight clothing from the victim.
- Make the victim lie down on his or her back.
- Raise the legs of the victim (shock position) above the level of his or her head. This will increase the flow of blood to the brain.
- Make sure the victim is exposed to plentiful supply of fresh air.
- If there is no improvement in a few minutes, rush the victim to the hospital
Caution: Do not try to warm the victim
Muscle cramps
A
muscle cramp is an involuntarily and forcibly contracted muscle that
does not relax. A muscle that contracts involuntarily is called a
‘’spasm.’’ If the spasm is forceful, it becomes a cramp. Therefore,
muscle cramps occur because of uncontrolled muscle spasms.
Signs and symptoms
- A sharp, sudden and painful spasm, or tightening of a muscle (especially common in the legs).
- Muscle hardness
- Twitching of the muscle
- Persistent cramping pains in the lower abdominal muscles.
Causes
- Imbalance in certain minerals, body fluids, hormones, and chemicals that allow stretching and contracting of our muscles.
- Malfunctioning in the nervous system.
- Excessive physical activity and hormonal imbalances cause us to sweat. This brings about the loss of many essential minerals, such as potassium and calcium, which our body muscles need.
Procedure
- Lay the victim down
- Gently massage and stretch out the cramped muscle(s).
- Apply some anti-cramp ointment to the affected area
- If the problem persists, seek medical help immediately.
Stretching and massaging the muscles
Hiccups
Hiccups
are caused by sudden involuntary contraction of the diaphragm muscles,
giving a characteristic ‘’hic’’ sound. Numerous cures for hiccups exist.
These cures are thought to work because they increase the level of
carbon dioxide in the blood, which usually stops hiccups. (See procedure
1-3 below). If the vagus nerve that runs from the brain to the stomach
is stimulated, hiccups can also be alleviated.
Procedure
- Give the affected person a polythene bag and encourage him/her to re-breath her own expelled air.
- Ask the person to drink a glass of cold water quickly.
- Tell the victim to hold his/her breath for as long as possible.
- Ask the victim to pull on his/her tongue.
- The victim may swallow finely crushed ice.
- Children can be given a teaspoonful of a weak solution of sodium bicarbonate or lemon juice.
- Place one teaspoonful of dry sugar or honey on the back of the victim’s tongue. (You can repeat this process 3 times at 2-minute intervals)
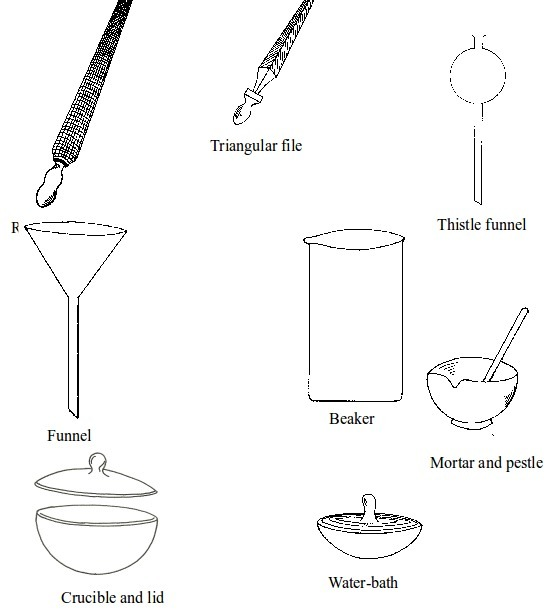
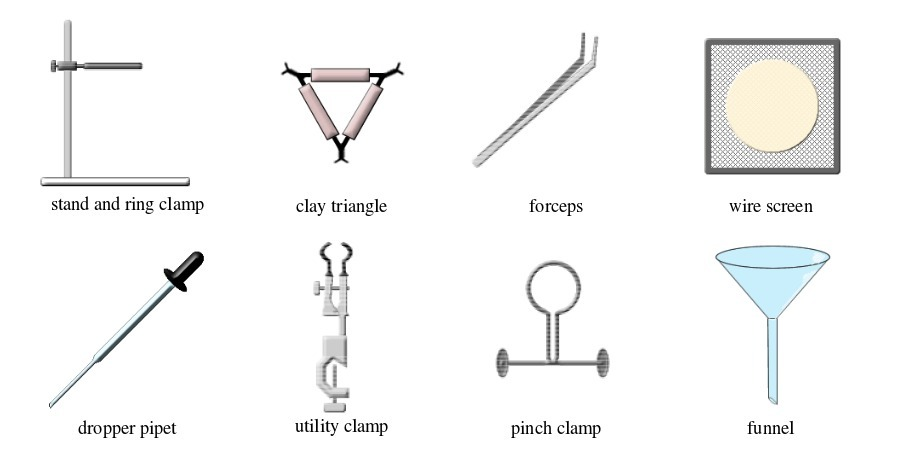
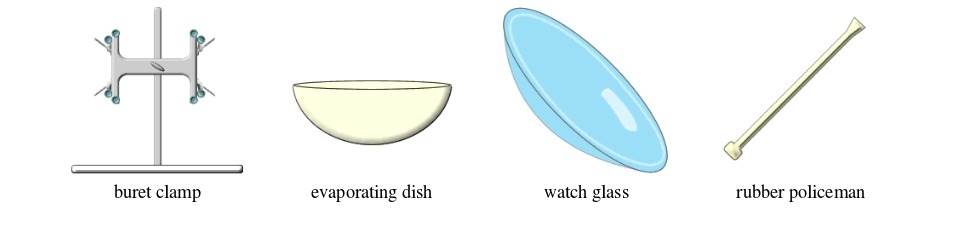
Basic chemistry laboratory apparatus and their uses
Instruments
used for carrying out different experiments in the laboratory are
called laboratory apparatus. Laboratory apparatus can be classified
according to their uses as:
- apparatus for holding things e.g. test-tube holder, retort stand and clamp, test-tube rack, tongs and tweezers;
- apparatus for taking measurements e.g. thermometer, burette, pipette, measuring cylinder, measuring flask, beam balance, electronic balance, common balance, measuring syringe, beaker and stop watch;
- apparatus for heating substances e.g. boiling tube, pipeclay triangle, crucible and lid, wire gauze, deflagrating (combustion) spoon, Bunsen burner, spirit lamp, tripod stand, evaporating dish, wire gauze and stove;
- apparatus for doing chemical reactions (or testing) e.g. beaker, test tube, dropper, flask, watch glass, gas jar and thistle funnel;
- apparatus for filtering e.g. filter funnel, filter paper and cotton wool;
- apparatus for grinding e.g. mortar and pestle;
- apparatus for storage e.g. reagent bottles and wash bottle;
- apparatus for scooping e.g. spatula; and
- apparatus for safety e.g. goggles and hand gloves.
The Apparatus Used in a Chemistry Laboratory
List the apparatus used in a chemistry laboratory
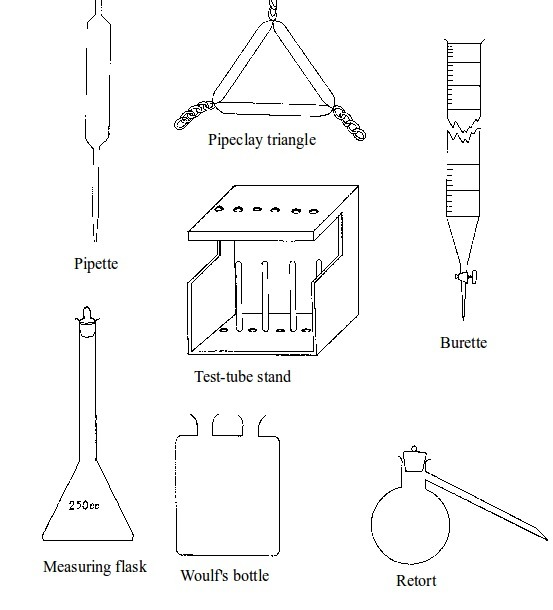
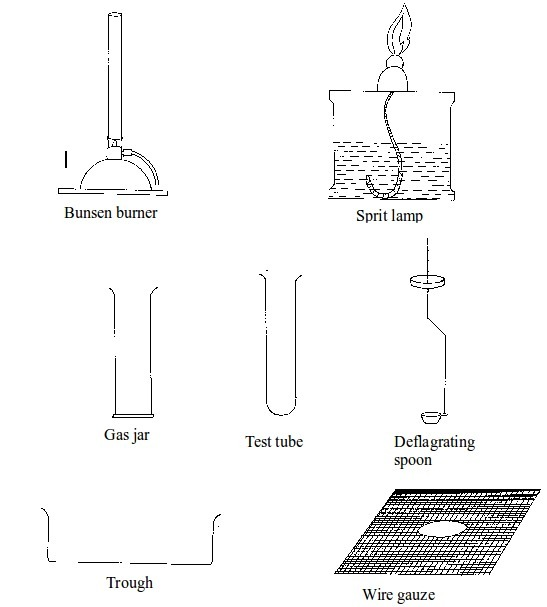
Some chemistry laboratory apparatus

Chemistry Laboratory Apparatus According to their Uses
Categorize chemistry laboratory apparatus according to their uses
The
apparatus can also be classified based on materials they are made of.
Most of the apparatus are made of glass. Others are made of metal,
plastic or wood. Just a few are made of clay and asbestos.
Table summarizes some common laboratory apparatus and their uses.
Composition and uses of some chemistry laboratory apparatus
| Apparatus | Material | Uses | |
| 1. | Test tube | Glass | Holding chemicals or, heating substances |
| 2. | Funnel | Glass or plastic | Leading liquids into containers, and for filtration purposes |
| 3. | Beaker | Glass or plastic | Holding, heating, and mixing liquids |
| 4. | Flask | Glass | Holding, heating, and titrations |
| 5. | Retort stand | Metal (iron) | Holding apparatus during heating |
| 6. | Tripod stand | Metal (iron) | Holding apparatus during experiments |
| 7. | Gas jar | Glass | Gas collection |
| 8. | Wash bottle | Plastic | Washing |
| 9 | Crucible | Ceramic or non-reactive metal | Heating |
| 10 | Test tube holder | Metal and plastic or wood | Holding test tubes while heating |
| 11. | Weighing balance | Metal and plastic | Measuring weight (or mass) |
| 12. | Spatula | Metal | Scooping small quantities of powder or crystalline chemicals |
| 13. | Condenser | Glass | Cooling hot liquids |
| 14. | Pipette | Glass | Accurate measurement of specific volumes of liquids for titrations |
| 15. | Burette | Glass | Titrations |
| 16. | Trough | Glass | Assists in gas collection |
| 17. | Tongs | Metal | Picking and holding hot substances and apparatus |
| 18. | Measuring jar | Glass | Measuring volumes of liquids |
| 19. | Thistle funnel | Glass | Leading liquids into containers and apparatus |
| 20. | Dropper | Glass and rubber | Dropping indicators into reagents |
| 21. | Mortar and pestle | Clay | Crushing or grinding substances |
| 22. | Wire gauze | Metal | Even distribution of heat during heating |
| 23. | Spring balance | Metal | Measuring weight |
| 24. | Distillation flask | Glass | Distillation |
| 25. | Combustion spoon | Metal | Burning powder in jars |
| 26. | Thermometer | Glass and liquid metal | Measuring temperature |
| 27. | Delivery tube | Glass | Allowing gases pass through |
| 28. | Bunsen burner | Metal | Heating substances |
| 29. | Separating funnel | Glass | Separation of immiscible liquid mixtures |
| 30. | Measuring cylinder | Glass or plastic | Measuring volumes of liquids |
| 31. | Measuring syringe | Plastic | Sucking in and measuring specific volumes of liquids |
| 32. | Stopwatch | Plastic or glass and metal | Accurate measurement of time |
| 33. | Watch glass | Glass | Used as a surface to evaporate some liquids, to hold substances being weighed or observed, or as a cover for a beaker |
| 34. | Boiling tube | Glass | Is a large test tube used to heat substances requiring strong heating, or when the sample is too large for a test tube |
| 35. | Evaporating dish | Ceramic | Heating and evaporating liquids and solutions |
| 36. | Filter paper | Paper | Filtration |
| 37. | Test tube rack | Wood or plastic | Placing test tubes |
| 38. | Reagent bottle | Glass | Storing different chemicals |
| 39. | Wash bottle | Plastic | Storing distilled water |
| 40. | Safety goggles | Glass | Protecting eyes from chemical spills, strong light and harmful vapours |
| 41. | Bell jar | Glass | Keeping gases, moisture, air, etc. or creating vacuums |
Common Chemistry Laboratory Apparatus
Use common chemistry laboratory apparatus
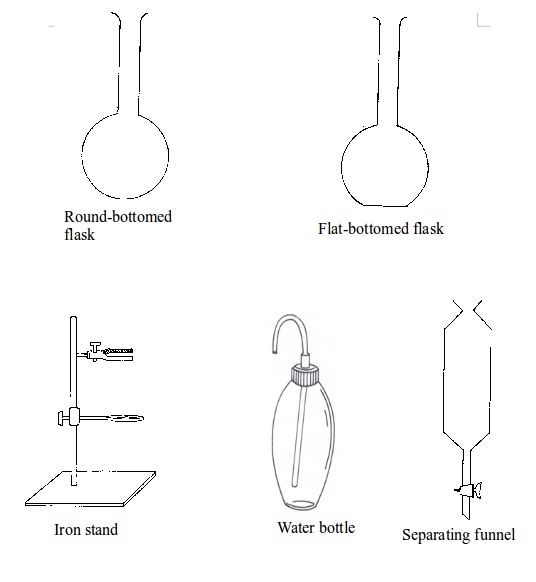
Common laboratory apparatus

Activity 1
Your teacher will guide you how to measure the volume of liquids using the other apparatuses.
Aim: To measure volume of liquids using different apparatus
Materials: pipettes, burettes, measuring cylinders, water, beakers.
Procedure
- Pour some water into a graduated measuring cylinder with a capacity of 100 cm3. Add the water, one drop at time, up to a 25-cm3 mark.
- While adding water, position yourself at eye-level with the mark on the cylinder. This will enable you to obtain the most accurate measurement. To simplify the work of reading the level of the water, you may use coloured water.
- Select a volumetric flask measuring 50 cm3. Pour the water into the flask until it reaches the mark on the flask’s neck.
- Position yourself at eye-level with the mark. You will obtain the most accurate reading when the mark appears straight rather than elliptical. To obtain this, put a flask on a flat table.
- Add water one drop at a time. Do so until the bottom of the curved surface of the water exactly matches the mark on the flask.
Activity 1.2
Aim: To measure the masses of solid substances
Materials: chemical, electronic or spring balance, watch glasses, various substances such as sand, sugar, salt, flour, stones, fruits.
Procedure
- Put an empty watch glass on the weighing balance. Note down its mass. Record this as mass M1.
- Place the various items you have on the watch glass, one item at a time. Note down the mass. Record this as M2.
Note:
to obtain the mass of an object, we subtract the mass of an empty watch
glass from the mass of the watch glass and the substance. That is, M2 - M1.
For example
i

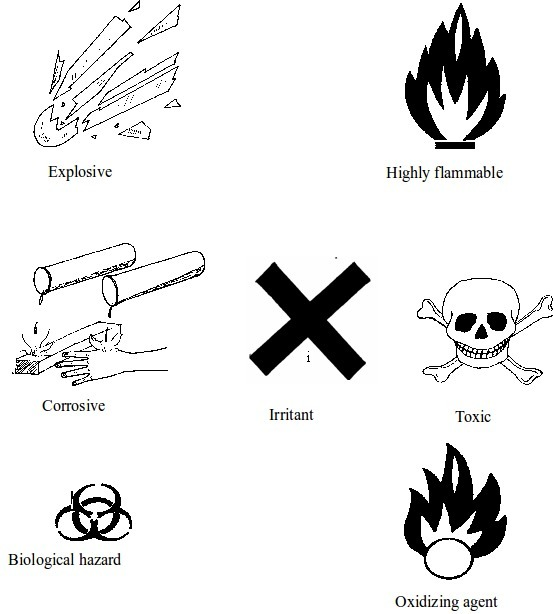
Warning signs
Chemical
warning signs are safety symbols found on containers, especially those
used in the laboratory. The symbols are also found on tanks or
containers that are used to carry, store or transport certain chemicals.
Containers holding flammable fuels such diesel, petrol and natural gas,
as well as those containing toxic chemicals normally bear warning
symbols. These symbols indicate the danger (hazard) likely to be caused
by the chemicals they contain if carelessly handled.
When
performing experiments in the laboratory it is important to read the
safety signs on chemical containers. This will minimize the chances of
causing accidents in the laboratory.
The Basic Chemical Warning Signs
Draw and label the basic chemical warning signs
Some chemical warning signs
The Concept of Warning Signs
Explain the concept of warning signs
Before
conducting any experiment in the laboratory you must be aware whether
the chemical you want to use is toxic, corrosive, flammable, oxidant,
explosive or harmful. This information will help you know how to handle
the chemicals safely. Proper handling of chemicals enables you avoid
unnecessary accidents. Below is an explanation pertaining to some hazard
labels represented by the symbols above.
Toxic
Toxic
substances include those that can poison you or the other person
working close to you in the laboratory. These substances can kill within
a short time or after some few days. They should not be allowed to get
into your body through body orifices (month, nose, eyes, ears, etc).
Neither should they be allowed to contact your skin. They become even
more dangerous when they get into the body. If it happens that these
substances touch your skin accidentally, wash it immediately with ample
water.
Corrosive
Corrosive
substances refer to those chemicals that can burn or corrode (eat away)
your skin. They can also corrode wood or metals. One can become blind
if such substances accidentally get into his/her eyes. If they contact
your skin, wash it immediately with a lot of water. Examples of
corrosive substances commonly found in a school laboratory are
concentrated mineral acids such as sulphuric acid, hydrochloric acid and
nitric acid, and concentrated alkalis such as sodium hydroxide,
potassium hydroxide and ammonia.
Flammable
These
chemicals catch fire easily. For this case, they should be kept away
from flames or fires. They can be set into fire by any kind of sparks,
be it from welding or fire. When working with flammable chemicals in the
laboratory all burners must be put off. These chemicals are usually
very volatile. The containers used to carry them must be stoppered
immediately after every use. Examples of flammable chemicals are
methylated spirit, ether, acetone and methanol.
Explosive
Explosive
chemicals are those that explode rapidly upon detonation (set into fire
or ignited). Because the reaction is rapid, it results into throwing
off particles at a high speed. For this reason, they should not be kept
in glass containers. This is because during explosion the particles will
disperse around and cause serious injuries to people. Those explosive
chemicals that can react without external detonation are even more
dangerous
Oxidizing agents
These
chemicals can stimulate a burning substance to burn efficiently and
faster. Therefore, they must be kept away from fires no matter how small
that fire may be. An example of oxidizing agent is oxygen gas.
Harmful or irritant
Harmful
substances are those that can impair your health or make you fall sick.
They do not normally kill instantly but have detrimental effects
following a long exposure to them. These chemicals do not kill
immediately. However, care must be taken when handling or dealing with
them. Irritating substances cause pains when in contact with the body.
They are dangerous to health when in contact with the body surface for a
long period of time.
TOPIC 3: HEAT SOURCES AND FLAMES
Heat sources
Most
chemical reactions require heat to proceed. It is therefore important
to have sources of heat in a laboratory for heating various reacting
substances. Sources of heat in a chemistry laboratory may include Bunsen
burner, candle, spirit burner, kerosene burner (stove), tin lamp (kibatari) and charcoal burner. These are burners commonly used in most school laboratories.
Different Heat Sources which can be Used in a Chemistry Laboratory
Name different heat sources which can be used in a chemistry laboratory
The
Bunsen burner is the best of all burners because it is convenient to
handle. Another advantage of the Bunsen burner is that it produces a hot
flame whose temperature is approximately 1000°C. The temperature can be
adjusted easily to produce a non-luminous flame, which does not produce
much soot.
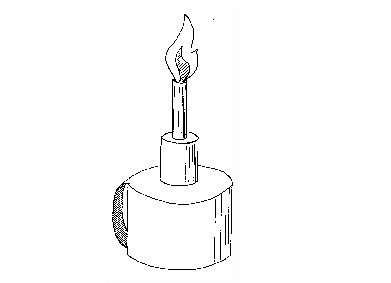
Spirit burner
The
spirit burner can also produce a soot-free flame. But the flame is not
hot enough to effect (produce) some chemical reactions. Apart from that,
the burner is filled with spirit, a substance that is highly flammable.
Spirit lamp
A candle
A
candle can only be used where a chemical reaction does not require much
heat. Its disadvantage is that it produces a lot of soot. The other
burners, though not commonly used, are an electric heater and a gas
burner.
The
electric heater uses electricity. The gas burner uses a liquefied gas.
The disadvantage of an electric burner is that it cannot be used in
rural areas where there is no electricity.
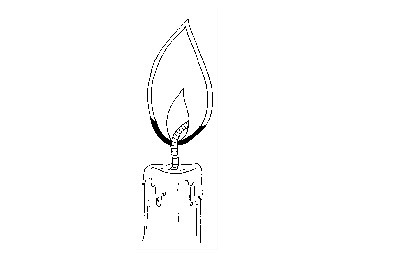
Candle
A kerosene burner
A kerosene burner (stove), also called jiko la mchina
in Swahili, if well adjusted can produce a flame hot enough to heat
many substances in the laboratory. It is fulled with kerosene, a fuel
that is convenient to carry and store. This fuel does not catch fire
easily as compared to spirit and it is affordable
It
can conveniently be used by schools in the most remote areas where
there is no electricity. If too much heating is required, wire gauze
should be placed on top of the burner. This will enable reduce soot and
increase the heating temperatures to about 1000°C or more.

Kerosene burner (stove)
A charcoal burner
A
charcoal burner can also be used in remove areas. In case the kerosene
burner is not available, for one reason or another, a charcoal burner
can be the best alternative.
The red-hot charcoal on the burner is almost soot-free. It can produce high temperature sufficient to carry out many reactions.

Charcoal burner
A tin lamp
A tin lamp (kibatari), though it produces a lot of soot, can also be used as a burner in a laboratory, especially in remote areas.
However, the heat it produces is not hot enough to initiate some reactions.
Tin lamp
The Functioning of a Bunsen Burner
Explain the functioning of a bunsen burner
Of
all the burners we have discussed so far, a Bunsen burner is the mostly
used. Therefore, we are going to discuss about the functioning of the
Bunsen burner in more detail. As the name suggests, this burner was
invented by a German scientist called Robert Bunsen, so it was named
after his name as a Bunsen burner. The burner uses coal gas, which burns
with a hot and non-luminous flame when the air holes are open. This is a
kind of flame we normally use in the laboratory.
Functions of different parts of the Bunsen burner
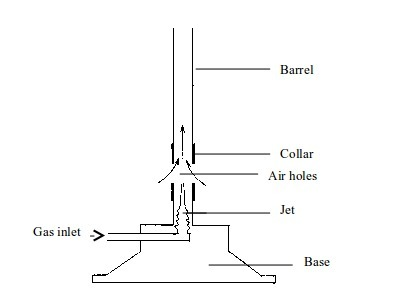
Base: Supports the burner. It makes the burner stable, due to its heavy weight, when placed on a bench.
Gas inlet: Lets the gas in from the gas supply.
Jet: Directs the gas to the barrel
Collar:
Regulates the amount of air entering the burner. It has air holes that
can be turned open or closed depending on the kind of flame, and hence
amount of heating required.
Air holes: These small holes on the collar allow air to enter in the burner.
Barrel: This is a part of the burner where air (from outside), and gas (from gas supply) mix up and burn.
How to light a Bunsen burner
After
knowing the different parts of the Bunsen burner, it is important that
you also learn how to light it. This is because careless use of the
burner may lead to accident or wastage of the gas. The following is a
correct sequence of steps on how to light the Bunsen burner:
- Connect the Bunsen burner by a rubber tube to the gas supply.
- Close the air holes.
- Turn the gas tap on to let in sufficient gas.
- Quickly bring a flame at the top of the barrel. You may use a matchstick, a lighter or wooden splint as a source of flame.
- Turn the collar to adjust the air holes until you get the type of flame you want. You may have the holes completely open.
- Adjust the gas tap until the gas supply is enough to produce a non-luminous flame.
To
put off the flame of the burner after you finish heating a substance,
turn the gas tap off in order to cut off the gas supply to the burner.
Disconnect the burner from the gas mains by removing the rubber tube
connecting the two. Then close the air holes. Pay attention not to touch
the hot collar with your fingers or else wait until it is cool enough.
Take the Bunsen burner and keep it at the appropriate place
Types of flame
Flames
are formed by burning gases or vapours. During burning, heat and light
are given out. For any solid or liquid to burn with a flame, it must
first turn into inflammable vapours (gaseous state).
Luminous and Non-luminous Flames from Different Types of Flames
Produce luminous and non-luminous flames from different types of flames
A
flame can be luminous or non-luminous. Flames of a candle and any oil
are usually smoky and luminous. Flames of such kind are normally of
little laboratory use. This is because they are not hot enough and would
deposit soot on laboratory apparatus. Coal gas also burns with a smoky
and luminous flame. With a Bunsen burner, one can produce two types of
flames namely, the luminous and non-luminous flames.
Luminous flame
This
is a type of flame produced when the air holes of a Bunsen burner are
closed. When the air holes are closed very little air enters the barrel
of the burner. In this case, the flame will be large, unsteady and
bright
The flame will have four main zones each having a distinct colour.
Luminous flame
- The inner dark zone - This is dark, cool and contains unburnt gas
- Luminous yellow zone - The gas burns in this zone but because the air is not enough the burning is incomplete. This leads to formation of tiny carbon particles from the gas. When these particles are white-hot, they result in formation of light (the yellow colour we see). If a cold evaporating dish, porcelain crucible, or glass is placed in this zone, it will blacken due to deposition of carbon particles (soot) on it.
- Outer zone - This is a non-luminous zone where the burning of the gas is complete due to presence of enough air. Because of the absence of carbon particles, this zone does not give out light. Consequently, the zone cannot be seen easily.
- Blue zone – Due to rising convectional current, there is sufficient supply of air for complete burning at this zone.
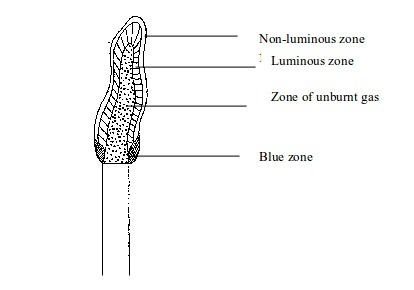
Non-luminous flame
When
air holes are fully opened, sufficient air enters the Bunsen burner
barrel and mixes well with the coal gas. Hence, the burning of the gas
is much quicker and complete. The flame is smaller and hotter.
Due
to absence of white-hot carbon, no light appears. The flame is
therefore non-luminous. The flame has three district zones each with a
different colour.
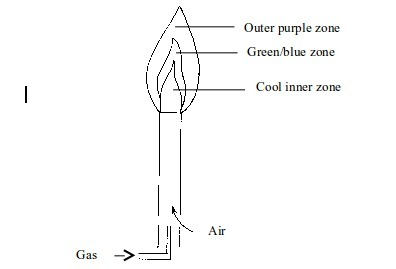
Non–luminous flame
- Cool inner zone – this is a zone of unburnt gas.
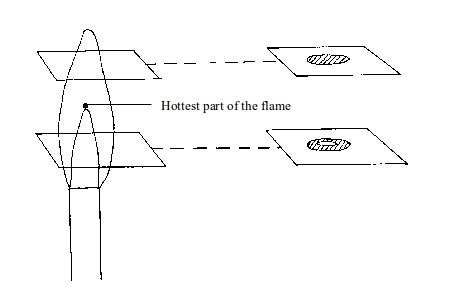
- Green/blue zone - part of the gas burns in this zone because there is not enough air to burn all the gas completely. However, no carbon is formed. The hottest part of the flame is at the tip of this zone.
- Outer purple zone – Burning of the gas in this zone is complete.
Major differences between luminous and non-luminous flames
| Non luminous flame | Luminous flame | |
| 1. | Formed when air holes are open | Formed when air holes are closed |
| 2. | Very noisy | Silent or calm |
| 3. | Comprises of three zones | Comprises of four zones |
| 4. | Forms no smoke or soot on apparatus | Forms a lot of smoke or soot on apparatus |
| 5. | Blue and almost invisible | Bright yellow and clearly visible |
| 6. | Very hot flame | Not a hot flame |
| 7. | Not bright | Very bright |
| 8. | Triangular flame | Wave-like flame |
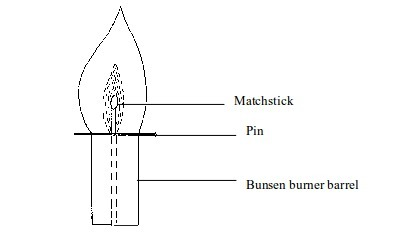
Investigation of different parts of a flame
We can easily find out whether or not the inside of a flame is cool. Two experiments can prove this:
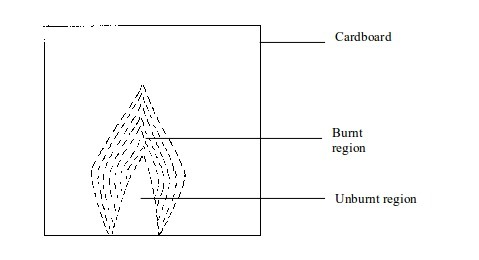
- (a) When a piece of cardboard is held horizontally over a non-luminous flame, we notice a burn mark as shown below:
When
held vertically over the flame, the burn mark is as shown in above.
Note that when performing this experiment, the cardboard should be
withdrawn from the flame just before it catches fire. We find that the
middle part of the cardboard does not get burned. This is the part in
the zone containing unburnt gas.
Burn mark on cardboard when held horizontally
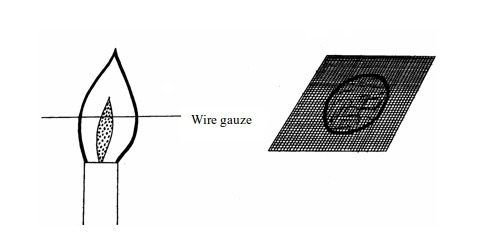
(b)
If the above experiment is repeated using a wire gauze, we notice that
the part in the middle will not become red hot except when the gauze is
held in the flame for a long time.
Burn mark on cardboard when held vertically
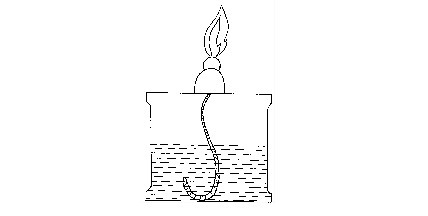
We
can prove the presence of unburnt gas in the Bunsen flame. This can be
done by inserting a glass tube into the flame as shown in figure bellow
The
unburnt gas can be shown to have risen up the tube by putting a light
at the top of the tube. The flame will form. This indicates the escape
of unburnt gas through the tube.
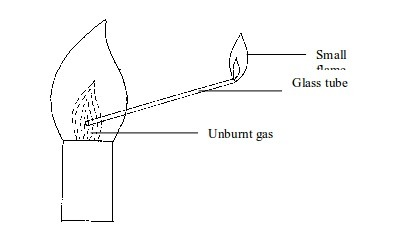
To indicate the presence of unburnt gas in a Bunsen burner flame
Uses of flames
Flames are used for different purposes. Some uses of the flames include the following:
- Production of heat for heating substances in the laboratory: In this case, a non-luminous flame, which produces much heat, is used. However, for reactions that require little heat, a luminous flame, which is not very hot, can be used.
- Flame tests for elements: In chemical analysis of some elements, a flame test is one of the preliminary tests normally used to identify an element. When some elements are strongly heated, they produce characteristic flame colours that distinguish them from one another. A non-luminous flame is often used.
- Production of light: Flames produce light that can be used to light a dark room. Therefore, an experiment that involves heating can even be conducted in the dark. The same flame is used to give heat as well as light. Here, a luminous flame is used. Examples of heat sources, which produce flames that may be used for lighting, are hurricane lamp, tin lamp, spirit lamp and candle.
- Cooking: Since it gives a hot flame and produces no soot, a non-luminous flame can be used for cooking food. Gas cookers, gas stoves and kerosene stoves usually produce such flames.
- Welding: A non-luminous flame is suitable for welding because it is very hot. In most welding operations, an oxyacetylene gas, a mixture of oxygen and ethyne, is used. When burned, the gas produces a flame hot enough to cut or melt the metal.
Significance of scientific procedure
The main steps of the scientific procedure
Each Step of the Scientific Procedure
Describe each step of the scientific procedure
Observation (identification) or statement of the problem
The
first step of the scientific procedure is to identify a researchable
problem. A problem is an obstacle that makes it difficult to achieve a
desired goal, objective or purpose. It refers to a situation, condition
or issue that is unresolved. Observation refers to identification of a
chemical phenomenon. This may include observing the colour, smell,
texture of a substance, and so on. Observing involves the use of senses
to obtain information. Observation is more than the bare fact of
observing. It is determined by use of five senses namely, smell, touch,
taste, vision and hearing. For example, to identify the colour of a
substance you have to see it with your eyes. The same case applies to
detection of the smell of a substance or gas produced by reacting
substances in a laboratory. To be able to detect the smell of a gas you
have to use your nose to smell it.
Observation
helps a scientist to identify a problem. Observation may involve making
measurements and collecting data. The data may be descriptive
(qualitative) or numerical (quantitative) in nature. Numerical
information such as the fact that a sample of sulphur powder measures
50g is quantitative. Non-numerical information, such as the fact that
the colour of anhydrous copper (II) sulphate is white, is qualitative.
Once
you identify a problem, it becomes easy to state it scientifically. For
example, you can observe that when you put a given volume of water in a
narrow container and expose it to open air, it takes much longer to
evaporate and decrease in volume. However, when you put the same amount
of water in a wide container, it takes a much shorter time to do so.
This phenomenon can be investigated scientifically.
Hypothesis formulation
After
identifying and stating the problem, you can formulate a testable
hypothesis for that problem. A hypothesis is a statement. It is a
prediction or proposed solution to a problem based on prior knowledge or
known information about a chemical phenomenon. It is a logical guess
about the outcome of the experiment. A hypothesis must be able to be
tested. Therefore, a hypothesis can be described as a tentative
explanation for an observation, phenomenon, or scientific problem that
can be tested by further investigation. It can be rejected, modified, or
accepted only after conducting an experiment to prove or disprove it.
Let
us take an example of water at the previous stage. It was observed that
the water held in a wide container evaporated faster than that in a
narrow container. Based on what we know about evaporation (prior
knowledge) we can formulate a hypothesis pertaining to this phenomenon.
It is well known that one of the factors affecting the rate of
evaporation is the surface area. From this fact, we can formulate a
testable hypothesis which states that “evaporation of water increases with increase in surface area of the container in which that water is placed”.
This is just a statement. It can be proved wrong or correct by setting
up and doing an experiment. Remember that this is just an example,
though not very much related to chemistry. We can turn to another
relevant example as well.
Now,
let us look at an example of anhydrous copper (II) sulphate. The
anhydrous salt is in powder form. When you expose this salt to open air,
it changes its colour and shape, from its original white powder to blue
crystals. Why does this happen? From our knowledge of the properties of
this salt (prior knowledge or information gathered) when it is placed
in open air, it absorbs water vapour from the air. It is this water
vapour which it absorbs that turns it blue. We can go as far as
formulating a hypothesis, which states that "When white anhydrous
copper (II) sulphate powder is exposed to open air, it absorbs water
vapour from the air and turns into blue crystals".
We still have a doubt about this hypothesis. How do we know that the
liquid absorbed by the salt is really water? To accept or reject this
hypothesis, we must conduct an experiment.
Experimentation
After
making a hypothesis, the next step is to plan and conduct an
experiment. Planning an experiment involves writing down steps for an
experiment that will answer the question. It should be remembered that
experimental plan should include short and clear steps. It should also
include the materials and methods that will be used in the experiment.
These may include safety gears such as goggles, gumboots, gloves, etc.
It must also state all expected hazards to be accompanied with the
reacting substances or chemical phenomena being experimented. This could
either occur as a result of mishandling chemicals or apparatus,
improper experimental procedure or even testing the products obtained
from the experiment.
In
the scientific method, an experiment is a set of observations
(qualitative or quantitative) made in the context of solving a
particular problem or question. An experiment is conducted in order to
retain or falsify a hypothesis concerning a particular phenomenon. The
experiment is a basis in the practical approach to acquiring deeper
knowledge about the chemical world.
Experimenting
involves carrying out a procedure under controlled conditions in order
to make observations and collect data. To learn more about matter,
chemists study systems. A system is a specific portion of matter in a
given region or space that has been selected for study during an
experiment or observation. When you observe a reaction in a test tube,
the test tube and its contents form a system.
Your
experiment tests whether your hypothesis is true or false. It is
important for your experiment to be a fair test. You conduct a fair test
by making sure that you change only one factor at a time while keeping
all other conditions the same (constant). These factors are also called
variables. They are the factors that affect the problem you want to
investigate. They can change or be changed during the experiment. Such
factors include temperature, volume, speed, light, concentration, light,
etc.
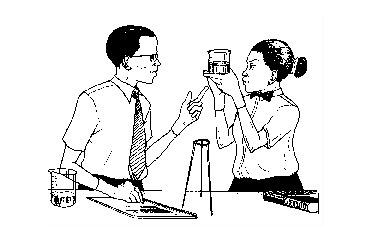
Students conducting an experiment
There are three types of variables. These are:
- Dependent variable: This is the factor that changes its value when the values of the other variables change. It is the value being measured.
- Independent variable: This is the factor that is manipulated so as to obtain different values.
- Controlled (or constant) variable: This is the factor that does not change, or is kept constant all the time. It does not affect the result of the experiment.
For
example, you might be interested to carry out an experiment to
determine the influence of the concentration of phosphorus fertilizer on
maize growth. To get the best results, you grow maize in similar
conditions of soil and atmospheric environment (controlled variable) but vary the quantity of fertilizer in each test (independent variable). Then you measure the height of maize plants (dependent valuable)
after a certain interval of time as shown in figure below. The value of
the height you will obtain will obviously depend on the amount
(concentration) of the fertilizer applied. This is a typical fair test.
However, most chemistry experiments do not involve fair tests.
Now,
let us turn back to our experiment. In the example of determining
whether the surface area increases the rate of evaporation or not, we
can design an experiment to prove or disprove this phenomenon. This is
conducted by filling a basin (with large surface area) and a bucket
(with small surface area) with 10 litres of water each. Then the two
containers are placed in open air for 3 days. Here, care must be taken
to place both containers under similar environmental conditions.
Containers must be of the same type, that is, both must be plastics,
metals, etc. In addition, the water used must be obtained from the same
source.
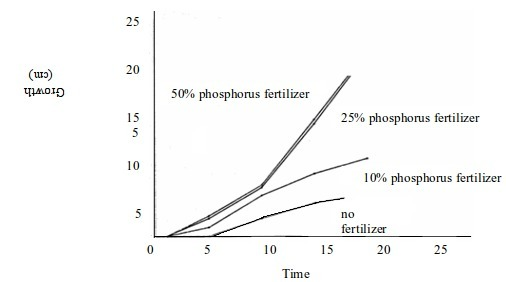
The effect of fertilizer on plant growth
The
only variable to be kept constant is the volume of water, which is set
to the volume of 10 litres. You should repeat your experiment several
times to make sure that the first results were not just an accident.

Determination of the effect of surface area on the rate of evaporation of water
Observation and collection of data
Observation
and recording of data must be done from the beginning to the end of the
experiment. Data is the information gathered during the experiment.
This can include descriptive (qualitative) and numerical (quantitative)
data. Numerical data is that which can be measured, for example, 10
litres of water, 5g of copper, a five centimetre long ribbon of
magnesium, etc. Qualitative data include information that cannot be
measured, e.g. colour, shape or appearance, smell, feel, etc. Recording
data is an important part of the scientific method because it helps
scientists organize their ideas and observations. Charts, graphs, lists,
diagrams, tables and even sketches are all the ways of recording data
during experiments. Records appearing in the form of tables are easy to
read, understand and interpret.
Continuing
with our hypothetical experiment for determining the effect of surface
area on the rate of evaporation, we expect that at the end of the
experiment the volume of water in each container will have dropped to a
certain extent.
We
also expect that the volume of water lost from the basin will be bigger
than that lost from the bucket. This means that more water will
evaporate from the basin than from the bucket. Considering that
scenario, we can then predict what the data can be like. Let us take
this model as a real experiment and assume the kind of results that
could be observed and collected during the experiment.
After
3 days of the experiment, water from each container was measured. The
results obtained were summarized in the following table.
Source: hypothetical
Data collected from evaporation experiment after 3 days
| Amount of water | Type of container | |
| Basin | Bucket | |
| Initial volume Final volume | 10 litres 7.0 litres | 10 litres 8.5 litres |
| Amount of water lost (evaporated off) | 3.0 litres | 1.5 litres |
Data analysis and interpretation
Once
your experiment is complete and after you have collected data, you
analyse your data to see if your hypothesis is true or false. In table
4.1, we find that, at the end of the experiment, 3 litres of water had
evaporated off from the basin as compared to 1.5 litres from the bucket.
What does this data tell us? What is it trying to reveal? This means
that from the basin (with large surface area) water evaporated faster
than that from the bucket (with small surface area). The data reveals
the fact that surface area plays a major role in evaporation of water
and many other liquid substances.
However,
you may sometimes get unexpected results. You may find that your
hypothesis was false. In such a case, you will construct a new
hypothesis and start the entire process of the scientific method over
again. Even if you find that your hypothesis was true, you may want to
test it again in a new way.
Conclusion
The
last stage (at this level of study) of the scientific method is to make
inferences and draw a conclusion. Scientists look at the information
they gathered and observed. Then they make connections to draw a
conclusion. These conclusions may be or may not be in agreement with
their predictions. Scientists make incorrect predictions all the time.
An important part of the scientific process is to understand why
predictions were incorrect. Many scientists will repeat an experiment
several times to see if they can replicate the results before
concluding. This ensures that they have conducted the experiment the
same way each time and make sure no introduced errors or outside factors
affected the experiment's outcome.
Based
on data in a hypothetical experiment above, we found that 3.0 litres of
water evaporated from the basin (a container with wide mouth and hence a
large surface area). At the same time, 1.5 litres of water evaporated
from a bucket (a container with a narrow mouth and hence a small surface
area). From this result, of course, we can conclude that evaporation of water increases with increase in surface area of the container in which that water is kept.
Therefore, our hypothesis is proved true and correct. Remember always
to base your conclusion on the collected and analysed data, though it
may deviate, to some extent, from the reality for one reason or another.
ADDITIONAL NOTES ON SCIENTIFIC PROCEDURE
In
advanced study, the last step of the scientific method is to share what
you have learned. Scientists share information so that others can use
the findings to create different questions and conduct different
experiments. Sharing information is an important part of working
together. Professional scientists will publish their final reports in
scientific journals, magazines, books, or even present their results at
scientific conferences. For the purpose of study at this level, the last
step is conclusion.
Even
though we show the scientific procedure as a series of steps, keep in
mind that new information or thinking might cause a scientist to back up
and repeat steps at any point during the process. A process like the
scientific method that involves such backing up and repeating is called
an iterative process. Therefore, the scientific process is an iterative process.
Concept of matter
States of matter
The Three States of Matter
Describe the three states of matter
Any chemical substance we study exists in any of the three forms (or physical states). The three different states of matter are
- solid state
- liquid state and
- gaseous states
So,
each of the many millions of substances around us can be classified as a
solid, a liquid or gas. Look around you and name substances that are
solids, liquids and gases. The state in which any matter exists depends
on temperature and sometimes pressure conditions. One substance may
exist as a solid in one condition and as a liquid or gas under a
different condition. Water is an example of such substances. This change
is called a change in the state of matter.
The
three physical states of matter differ in the way they respond to
temperature and pressure. All three states can increase in volume
(expansion) when the temperature is increased. They decrease in volume
(contraction) when the temperature is decreased. Gases are easily
compressed. Liquids are only slightly compressible. Solids are
incompressible. They are not affected by change in pressure.
Investigation of the compressibility of solids, liquids and gases
Procedure
- Take three new syringes and fill them with sand, water and air respectively (figure 5.1).
- Try to push in the end of each syringe.
- Observe what happens.
Figure
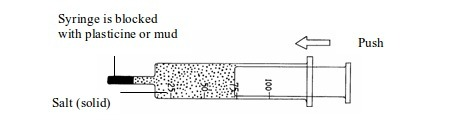
Compressibility of solids, liquids and gases
Observation
Which of the substances under investigation can compress into a smaller volume?
Findings
You should have found that a solid (sand) and a liquid (water) cannot be compressed but a gas (air) is easily compressed.
The three states of matter differ in their physical properties. These differences in properties are summarized in table bellow
Differences in properties of the three states of matter
| Property | Physical state | ||
| Solid | Liquid | Gas | |
| Shape | has a definite shape | no definite shape, takes shape of the container | no definite shape, occupy whole container |
| Volume | has a fixed volume | has a fixed volume | variable (depending on temperature and pressure) |
| Fluidity | does not flow | generally flows easily | flows easily |
| Expansion on heating | low | medium | high |
| Compressibility | incompressible | almost incompressible | highly compressible |
| Motion of particles | slow | high | very high |
| Density | high | moderate to high | low |
| Tangibility | tangible | tangible | intangible |
| Visibility | visible | visible | invisible |
One State of Matter to Another
Change one state of matter to another
We
have seen that matter exists in three different states - solids,
liquids and gases. We can use the kinetic theory of matter to explain
how a substance changes from one state to another. Basically, changes
from one state to another are caused by alterations in temperature and
pressure. Normally molecules, ions or atoms of a substance move faster
when the temperature is increased.
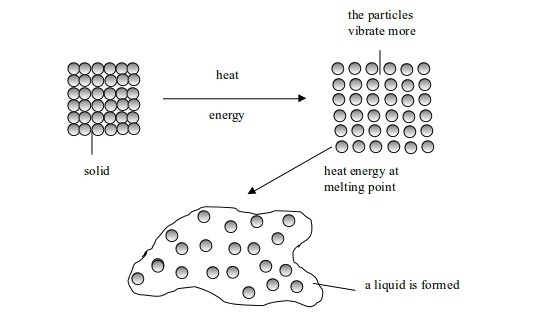
Melting and freezing
Melting
is a change from solid to liquid state. When solids are heated, their
constituent particles (atoms, molecules or ions) get energy and vibrate
more violently. Vibrations of these particles overcome (exceed) their
binding forces. The particles become mobile. The crystalline structure
of solid is destroyed. A liquid state is reached and the particles are
free to move. The temperature at which this happens is called melting point of the solid.
The
melting point of a solid tells us something about the strength of
forces holding its constituent particles together. Substances with high
melting points have strong forces between their particles. Those with
low melting points have weak forces between their particles.
Change in state from solid to liquid
Freezing
is a change from liquid to solid state. Freezing is the opposite of
melting. The process is reversed at the same temperature if a liquid is
cooled. The temperature at which a substance turns to a solid is called freezing point.
The melting point and freezing point of any given substance are both
the same. For example, the melting and freezing of pure water takes
place at 0°C. Melting is not affected by any changes in atmospheric
pressure.
Evaporation and boiling
Boiling
is a change from liquid to vapour state at a particular temperature.
Evaporation is the change from liquid to vapour state at any given
temperature. If a liquid is exposed to open air, it evaporates.
Splashes of water evaporate at room temperature. After rain, small pools
of water dry up. When a liquid changes into a gas at any temperature,
the process is called evaporation. Evaporation takes places
from the surface of the liquid. The larger the surface area, the faster
the liquid evaporates. The warmer the liquid is, the faster it
evaporates. Thus, surface area and temperature affects the rate of
evaporation of a liquid.
When
a liquid is heated, its molecules get more energy and move faster. They
knock into each other violently and bounce further apart. As the
heating goes on, its molecules vibrate even faster. Bubbles of gas (due
to air dissolved in water) appear inside the liquid. The whole process
is called boiling. The temperature at which a liquid boils is called boiling point.
The
molecules at the surface of the liquid gain enough energy to overcome
the forces holding them together. They break away from the liquid and
from a gas (vapour). As more of the liquid molecules escape to form a
gas, a liquid is said to evaporate. This occurs at the boiling point of a
liquid.
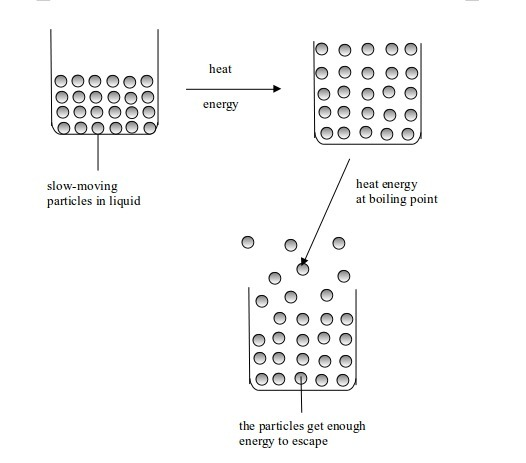
Change in state from liquid to gas
The
temperature at which a liquid boils explains how strong the forces
holding its particles (molecules) together are. Liquids with high
boiling points have strong forces of attraction between their molecules
than those liquids with low boiling points.
The
boiling point of a liquid can change if the surrounding pressure
changes. If the surrounding pressure falls, the boiling point also
falls. The boiling point of water at standard pressure (760 mmHg) is
100°C. On a high mountain, where pressure is low, it is lower than
100°C. If the surrounding pressure is increased, the boiling point
rises. The same behaviour is experienced by a gas when the pressure is
either increased or decreased.
The melting and boiling points of some common chemical substances at standard temperature and pressure (s.t.p)
| Substance | Physical state at room temperature (20°C) | Melting point (°C) | Boiling point(°C) |
| Oxygen | gas | -219 | -183 |
| Nitrogen | gas | -210 | -196 |
| Ethanol (alcohol) | liquid | -117 | 78 |
| Water | liquid | 0 | 100 |
| Sulphur | solid | 115 | 444 |
| Common salt (sodium chloride) | solid | 801 | 1465 |
| Copper | solid | 1083 | 2600 |
| Carbon dioxide | gas | sublimation point (°C): -78 | |
From the above explanation, obvious differences between evaporation and boiling can be detected. See table bellow
| Evaporation | Boiling |
| 1.Occurs at all temperatures | Occurs at one particular temperature (boiling point) |
| 2.Occurs on the surface of the liquid | Occurs both inside and on the surface of the liquid |
| 3.Takes place slowly | Takes place faster |
| 4.Bubbles are not necessarily formed | Bubbles are formed |
Therefore, the two terms can be defined as follows: Evaporation is a change in state of a substance from liquid to gas (vapour) state at any temperature.
Boiling is a change in state of a substance from liquid to gas at a particular temperature and pressure.
Condensation and solidification
The
reverse of evaporation is condensation. This is brought about by
cooling. When a gas is cooled down, its particles lose energy. They move
more and more slowly. When they knock into each other, they do not have
enough energy to bounce away again. They stay close together and a
liquid forms. This process is called condensation. When the
liquid is cooled further, the movement of the particles slows down even
more. Eventually, they stop moving and a solid forms. This is called solidification.
Condensation can be defined as a change in state of a substance from gas (vapour) to liquid. Solidification is a change from liquid to solid state of a substance. Solidification is the same as freezing.
Sublimation
A
few solids do not melt when they are heated. Instead, they change
directly from the solid to gaseous state without passing through the
liquid state. This change in state is called sublimation. When a
solid changes directly into gas, it is said to sublime. Iodine, solid
carbon dioxide ("dry ice") and ammonium chloride are examples of solids
that sublime. Like melting, sublimation also occurs at one particular
temperature for each pure solid.
The Importance of Changing One State of Matter to Another
Explain the importance of changing one state of matter to another
The following points summarize the importance of change in state:
1. Separation of mixtures
Different
mixtures can be separated through such processes as distillation,
sublimation, evaporation and condensation. Let us have a look at an
example of distillation. This process involves boiling, evaporation and
condensation. Distillation as a process can be applied in separation of a
mixture (solution) of two or more substances. A mixture of two or more
substances with different boiling points e.g. water and alcohol can be
separated by this means. In such a case, a container with the mixed-up
liquids is heated. The liquid with a low boiling point evaporates and
condenses first, leaving the one with a high boiling point in the
container. The distillate (liquid with low boiling point) is collected,
cooled down and transferred into another container.
2. Industrial manufacture of products
Industrially,
the process of distillation is applied in the production of pure
substances such as beer and other alcoholic drinks such as wine, vodka, konyagi, etc. The manufacturing process involves boiling, evaporating and condensation.
3. Refining of petroleum (crude oil)
Crude
oil contains organic liquid components, each with a different boiling
point. In the refinery, the components with lower boiling points
evaporate first and get separated out, leaving those with higher boiling
points behind. In this way, we get various types of oil components
(fractions) such as petrol, diesel, kerosene, lubricating oil, etc.
4. Drying of crops and clothes
When
you suspend your clothing on a cloth line to dry, the moisture in it is
lost through evaporation. Likewise, farmers in the village often spread
crops on the ground to dry. They do this in order to reduce moisture
content and hence prevent decaying. The moisture contained in crops
leave by evaporation. Therefore, you can notice how evaporation, as a
change in state, is important in everyday lives.
5. Cooling of our bodies in hot weather
You
all like to drink cold water or beverages especially during hot
weather. You can use a refrigerator to cool down drinking water or
beverages directly. Alternatively, you can freeze water into ice and
then use the resulting ice for cooling the beverage. Ice blocks are also
saleable. Moreover, one can earn some money if she freezes water into
ice blocks and then sells them to beverage vendors. Perishable products
such as fish, meat, milk, etc are often packed in ice blocks to prevent
them from going bad. Ice, as we studied early, is formed when water
freezes (a change in state from liquid to solid).
6. Ice formation in refrigerators
You
all like to drink cold water or beverages especially during hot
weather. You can use a refrigerator to cool down drinking water or
beverages directly. Alternatively, you can freeze water into ice and
then use the resulting ice for cooling the beverage. Ice blocks are also
saleable. Moreover, one can earn some money if she freezes water into
ice blocks and then sells them to beverage vendors. Perishable products
such as fish, meat, milk, etc are often packed in ice blocks to prevent
them from going bad. Ice, as we studied early, is formed when water
freezes (a change in state from liquid to solid).
7. Melting metals to make alloys
In
metallurgical industries, need may arise to mix two or more metals
(alloys) together. This is only possible, where two or more metals are
first melted at high temperatures into liquids. Then the resulting
liquid metals are mixed in appropriate proportions. This is followed by
cooling down the mixture to a solid alloy. Normally alloys have better
qualities than individual metals.
8. Testing the purity of substances
The
presence of impurity may lower or raise the boiling point of the
substance. A pure substance melts and boils at definite temperatures
(see table 5.4). The values for the melting point and boiling point are
precise and predictable. This means that we can use them to test the
purity of a sample. They can also be used to check the identity of
unknown substance.
A typical example
Sea
water is impure. It freezes at a temperature well below the freezing
point of pure water (0°C) and boils at a temperature above the boiling
point of pure water (100°C). Other substances behave in a similar
manner. So, boiling as a change in state can be used to test for the
purity of a substance.
In
addition, the impurity also reduces the exactness of the melting or
boiling point. An impure substance melts or boils over a range of
temperature, not at a particular point.
Melting and boiling points of some pure substances
| Substance | Melting point (°C) | Boiling point (°C) |
| Water | 0 | 100 |
| Ethanol | -117 | 78 |
| Oxygen | -219 | -183 |
| Sodium | 98 | 890 |
| Sulphur | 119 | 445 |
| Iron | 1540 | 2900 |
| Diamond | 3550 | 4832 |
| Cobalt | 1492 | 2900 |
| Nitrogen | -210 | -196 |
| Propane | -188 | - 42 |
| Ethanoic acid | 16 | 118 |
9. Formation of rain
Perhaps
the most important of all, as far as change in state is concerned, is
the formation of rain. Rained is mainly formed through the process of
evaporation and condensation. Water vapour, evaporating mostly from
water bodies (oceans, seas, lakes, rivers, ponds, etc), land and plants
rises up to the sky. As it rises, it cools down and condenses into tiny
droplets
On
further cooling as they rise up, these droplets form bigger water
drops. Owing to gravitational force, these drops fall down as rainfall.
Every one of you knows how important rain is to our life. Therefore, you
have noticed how evaporation and condensation, as changes in state,
contribute to rain formation.
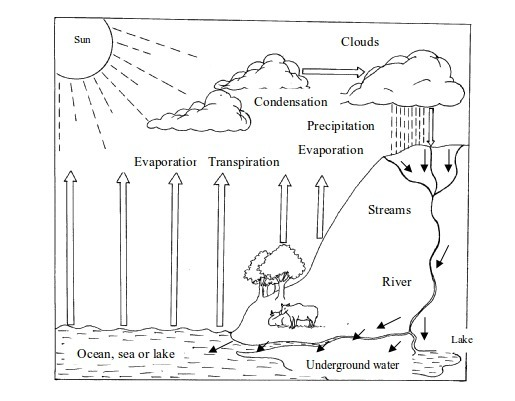
Rain formation
Kinetic nature of matter
We
already know that matter is composed of atoms, ions or molecules. We
have not yet considered the reason why the same substance, say water,
can exist in more than one form, for example as solid ice, liquid water,
and gaseous steam. But does matter behave like that?
The kinetic theory of matter
has been used to explain the way in which the arrangement of the
particles of a substance can determine the properties of that substance,
and particularly the state in which it is likely to be found under a
given set of conditions. The idea is that all matter is made up of tiny
moving particles. The main points of the theory are as follows:
- All matter is made up of tiny particles (atoms and molecules) that are invisible to the naked eye and to most microscopes.
- The particles are moving all the time. The higher the temperature is, the higher the average energy of the particles.
- Heavier particles move more slowly than lighter particles at the same temperature.
- Each substance has unique particles that are different from the particles of other substances.
- The particles of matter are held together by strong electrostatic forces.
- There are empty spaces between the particles of matter that are very large compared to the particles themselves.
The solid state
In
the solid state, the particles are so closely packed (see figure
bellow. The particles are held together by strong forces of attraction
that act like a chemical glue. Free movement of particles cannot take
place. They cannot move around freely in this arrangement. Instead, they
vibrate about a fixed position. They are arranged in a fixed pattern
which form a cluster of vibrating masses. This makes a solid to have a
fixed shape, which cannot be changed except by applying strong external
forces.
The liquid state
The
particles of a liquid are also closely packed but the forces of
attraction between them are weaker than of a solid. These forces of
attraction tend to bind them together. The particles have more kinetic
energy and they can move around each other. The binding forces are
strong when particles come close to one another. It is thought that the
particles of a liquid are fairly randomly arranged but consist of
"clusters" closely packed together. This property makes a liquid to have
a definite volume. However, since the particles are fairly free to move
a liquid does not have any characteristic shape (see figure 5.5(b).
Thus, a liquid will always take the shape of its container.
The gaseous state
The
gaseous state is one in which the particles are moving independently of
each other in all directions and at great speeds. The particles of a
gas are relatively far apart. They exert no force of attraction on each
other. They have more energy than the particles of solids and liquids.
They move rapidly and randomly, colliding with each other and with the
walls of the container. A typical speed for a molecule of hydrogen in
air at ordinary temperature and pressure has been found to be
approximately 500 ms-1
It
has been estimated that a nitrogen molecule makes collisions each
second. Thus, a gas will rapidly spread out to fill any container in
which it is placed. A gas cannot have any shape of its own.
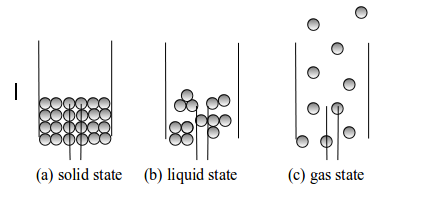
Three states of matter
Physical and chemical changes
Depending on the nature of change, all changes that matter undergoes can be classified as either physical or chemical.
The Characteristics of a Physical Change
Describe the characteristics of a physical change
Physical change
Substances
may undergo changes in their physical properties e.g. changes in
colour, shape (or form), state, density, structure and texture, etc. If
you take a stone and break it down into small particles, you will have
only changed its form, but it will remain as a stone. Likewise, melting
ice to water or freezing water to ice does not change it, but it is
still water. The same case happens when you dissolve salt in water to
get a solution of salt in water. You can still get back the original
salt by evaporation, except that the crystals of the salt obtained will
not look exactly the same as those of the original salt.
These
changes of state are examples of physical changes. Physical changes
such as melting and boiling do not result in new substances being formed
For example, ice and water still contain the same particles whether in solid (ice) liquid (water) or gaseous (vapour) state.
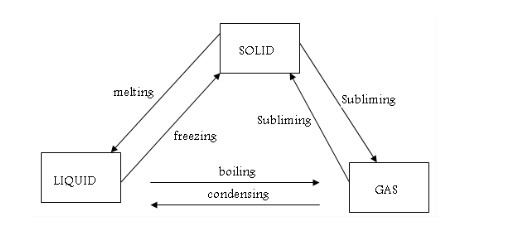
Changes in states
Characteristics
In
the explanation above, we find that in a physical change it is only the
physical form, and not the actual nature, of a substance that changes.
The changes are brought about by a mere addition or removal of heat, as
in the case with water or ice. Such a change is called a physical
change. It can be distinguished by the following characteristics:
- There is no formation of a new substance. Consider an example given above. The ice, liquid water and steam are the solid, liquid and gaseous forms of the same substance (water).
- There is no change in weight of the substance undergoing the change. If you start with 50g of ice, you will still get the same mass of water and steam (vapour) upon melting and boiling respectively.
- The changes are readily reversible. You can easily change water back to ice and vapour to water by a mere subtraction of heat (cooling).
- It is not accompanied by a great heat change. Just a little heat is required to change ice to water, and water to steam.
Physical Changes of Matter Experimentally
Demonstrate physical changes of matter experimentally
Experiment
- Add some common salt (sodium chloride) to distilled water in a beaker. Stir the mixture until the salt disappears and forms a solution with water. Transfer the water into a porcelain dish. Heat the content until all the water has evaporated off. The salt reappears in its original white solid form.
- Grind some roll sulphur in a mortar to powder. Put the resultant powder in a test-tube and heat gently, shaking all the time. The sulphur melts to an amber-coloured liquid. On cooling, this liquid returns to its original condition as a yellow solid.
- Put a block of ice in a beaker. Heat gently until the whole block melts to form water. Pour the water formed in a cup and place it in a deep freezer overnight. The water will freeze back to ice.
You
will have seen that all the above changes involve only changes in
physical forms of the substances. The chemical nature of substances
remained unchanged. Therefore, we can define a physical change as a
change that does not involve formation of a new substance but involves a
change in state or physical form of the substance and that such a form
can be reversed.
The Characteristics of a Chemical Change
Describe the characteristics of a chemical change
Chemical change
Some
changes that materials undergo are permanent. Such changes usually
involve changes in chemical properties of a substance. For example, when
you burn a piece of wood in fire, you get ash. The properties of wood
and ash are very different. There is no way you can change ash back to
wood. It is practically impossible. A permanent change in chemical
properties of a substance is called a chemical change. In a chemical
change, a substance losses all its physical and chemical properties.
Characteristics
Includes
- A chemical change results in the formation of a new substance. The new substance has different chemical and physical properties as compared to the original substance.
- It is generally not reversible. For example, you cannot turn the ash back to wood.
- There is a change in weight or mass of the substance undergoing the change. When you burn wood weighing 5 kg, you cannot expect to get the same weight of ash.
- The change is accompanied by a considerable heat change. For wood to burn to ash a lot of heat must be supplied.
Chemical Changes of Matter Experimentally
Demonstrate chemical changes of matter experimentally
Experiment
- Strongly heat some roll sulphur on a deflagrating spoon until it melts and begins to burn with a blue flame. If you continue heating, it gradually decreases in amount and finally the spoon will be left empty. The disappearance of sulphur is due to the formation of a new gaseous substance that is invisible. The presence and existence of a gas in air can be defected by its irritating smell. The gas can also be detected by burning the sulphur in a gas jar to which some blue litmus solution has been added. The gas formed, sulphur dioxide, will turn the blue litmus paper into a red one.
- With the aid of tongs, subject a piece of magnesium ribbon to a Bunsen burner flame. The ribbon burns to produce a new substance, white ash of magnesium oxide.
- Wrap a wet cotton wool around an iron nail. Keep it in a test tube for 3 days. By the 3rd day, some brown marks of rust will appear on the surface of the nail. Rust is hydrated iron (III) oxide. This is quite a new substance compared to iron nails.
Table
Differences between physical and chemical changes
| Physical change | Chemical change |
| 1. Produces no new kind of matter | Always produces a new kind of matter |
| 2. There is no change is mass or weight of the substance | 2. There is a substantial change in the weight of the substance |
| 3. The change can be reversed | 3. The change cannot be reversed |
| 4. Little heat is absorbed or evolved | 4. Heat changes may be large |
| 5. The change involves only a change in physical properties of a substance | 5. Both physical and chemical properties are changed. |
Elements and symbols
Depending on the nature of change, all changes that matter undergoes can be classified as either physical or chemical.
The Characteristics of a Physical Change
Describe the characteristics of a physical change
Physical change
Substances
may undergo changes in their physical properties e.g. changes in
colour, shape (or form), state, density, structure and texture, etc. If
you take a stone and break it down into small particles, you will have
only changed its form, but it will remain as a stone. Likewise, melting
ice to water or freezing water to ice does not change it, but it is
still water. The same case happens when you dissolve salt in water to
get a solution of salt in water. You can still get back the original
salt by evaporation, except that the crystals of the salt obtained will
not look exactly the same as those of the original salt.
These
changes of state are examples of physical changes. Physical changes
such as melting and boiling do not result in new substances being formed
For example, ice and water still contain the same particles whether in solid (ice) liquid (water) or gaseous (vapour) state.
Changes in states
Characteristics
In
the explanation above, we find that in a physical change it is only the
physical form, and not the actual nature, of a substance that changes.
The changes are brought about by a mere addition or removal of heat, as
in the case with water or ice. Such a change is called a physical
change. It can be distinguished by the following characteristics:
- There is no formation of a new substance. Consider an example given above. The ice, liquid water and steam are the solid, liquid and gaseous forms of the same substance (water).
- There is no change in weight of the substance undergoing the change. If you start with 50g of ice, you will still get the same mass of water and steam (vapour) upon melting and boiling respectively.
- The changes are readily reversible. You can easily change water back to ice and vapour to water by a mere subtraction of heat (cooling).
- It is not accompanied by a great heat change. Just a little heat is required to change ice to water, and water to steam.
Physical Changes of Matter Experimentally
Demonstrate physical changes of matter experimentally
Experiment
- Add some common salt (sodium chloride) to distilled water in a beaker. Stir the mixture until the salt disappears and forms a solution with water. Transfer the water into a porcelain dish. Heat the content until all the water has evaporated off. The salt reappears in its original white solid form.
- Grind some roll sulphur in a mortar to powder. Put the resultant powder in a test-tube and heat gently, shaking all the time. The sulphur melts to an amber-coloured liquid. On cooling, this liquid returns to its original condition as a yellow solid.
- Put a block of ice in a beaker. Heat gently until the whole block melts to form water. Pour the water formed in a cup and place it in a deep freezer overnight. The water will freeze back to ice.
You
will have seen that all the above changes involve only changes in
physical forms of the substances. The chemical nature of substances
remained unchanged. Therefore, we can define a physical change as a
change that does not involve formation of a new substance but involves a
change in state or physical form of the substance and that such a form
can be reversed.
The Characteristics of a Chemical Change
Describe the characteristics of a chemical change
Chemical change
Some
changes that materials undergo are permanent. Such changes usually
involve changes in chemical properties of a substance. For example, when
you burn a piece of wood in fire, you get ash. The properties of wood
and ash are very different. There is no way you can change ash back to
wood. It is practically impossible. A permanent change in chemical
properties of a substance is called a chemical change. In a chemical
change, a substance losses all its physical and chemical properties.
Characteristics
Includes
- A chemical change results in the formation of a new substance. The new substance has different chemical and physical properties as compared to the original substance.
- It is generally not reversible. For example, you cannot turn the ash back to wood.
- There is a change in weight or mass of the substance undergoing the change. When you burn wood weighing 5 kg, you cannot expect to get the same weight of ash.
- The change is accompanied by a considerable heat change. For wood to burn to ash a lot of heat must be supplied.
Chemical Changes of Matter Experimentally
Demonstrate chemical changes of matter experimentally
Experiment
- Strongly heat some roll sulphur on a deflagrating spoon until it melts and begins to burn with a blue flame. If you continue heating, it gradually decreases in amount and finally the spoon will be left empty. The disappearance of sulphur is due to the formation of a new gaseous substance that is invisible. The presence and existence of a gas in air can be defected by its irritating smell. The gas can also be detected by burning the sulphur in a gas jar to which some blue litmus solution has been added. The gas formed, sulphur dioxide, will turn the blue litmus paper into a red one.
- With the aid of tongs, subject a piece of magnesium ribbon to a Bunsen burner flame. The ribbon burns to produce a new substance, white ash of magnesium oxide.
- Wrap a wet cotton wool around an iron nail. Keep it in a test tube for 3 days. By the 3rd day, some brown marks of rust will appear on the surface of the nail. Rust is hydrated iron (III) oxide. This is quite a new substance compared to iron nails.
Table
Differences between physical and chemical changes
| Physical change | Chemical change |
| 1. Produces no new kind of matter | Always produces a new kind of matter |
| 2. There is no change is mass or weight of the substance | 2. There is a substantial change in the weight of the substance |
| 3. The change can be reversed | 3. The change cannot be reversed |
| 4. Little heat is absorbed or evolved | 4. Heat changes may be large |
| 5. The change involves only a change in physical properties of a substance | 5. Both physical and chemical properties are changed. |
Separation of mixtures
To
make use of the materials around us, we need methods for physically
separating the many and varied mixtures that we come across. One of the
distinctive characteristics of a mixture of substances is that it is
usually possible to separate the constituents by physical means. There
are many different physical methods used to separate a wide variety of
mixtures. The particular method employed to separate any given mixture
depends upon the nature of its constituents. The following are some of
the methods in wide use.
The Different Methods of Separating Mixtures
Describe the different methods of separating mixtures
1. Filtration
This method is best applicable in separation of components of mixtures called suspensions.
A
mixture of chalk dust or flour with water can be separated by filtering
the suspension. The suspended particles get trapped in the filter
paper. The trapped particles are called the residue. The water is called the filtrate
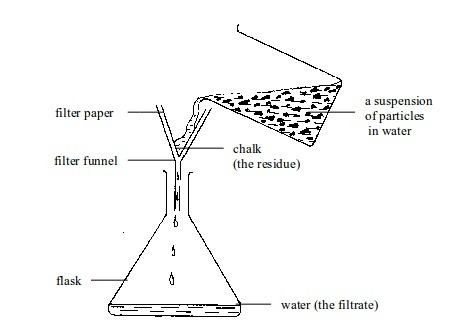
Filtration
2. Decantation
This
is another method that can be used to separate mixtures called
suspensions. However, in this case, separation will be successful if the
suspended particles are large enough. Otherwise, the decantation
exercise should be accompanied by filtration if you want to get a clear
liquid.
Once the solid has settled to the bottom of the container (sedimented), the liquid can be carefully poured off. This is called decantation. Decantation can be applied to separate such components as mixtures of mud, sand or gravel in water and so on.
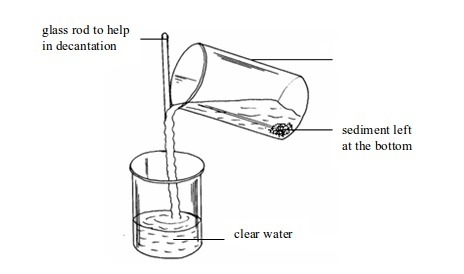
Decantation of muddy water
3. Evaporation
This
method is used to separate substances that form a solution. In such a
mixture, the solute is completely dissolved in a solvent to make a
uniform solution. To separate these substances, the solution is heated
so that the solvent evaporates, leaving the solid residue behind.
A mixture of salt or sugar in water can be separated by applying this method.
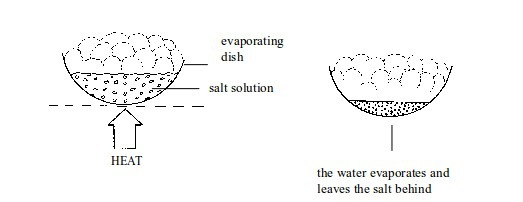
Evaporating the solvent
4. Simple distillation
Separating
a liquid from a solution can be carried out by distillation. The
boiling point of a liquid is usually very much lower than that of the
dissolved solid. The liquid can easily be evaporated off in a
distillation flask. It is condensed by passing it down a water-cooled
condenser and then collected as the distillate
This
method can be used to obtain pure water from impure water or from water
with dissolved impurities. The process may be used to separate a liquid
from a solution or to separate two liquids whose boiling points differ
by an appreciable temperature interval. This is a way of getting a pure
solvent out of a solution.
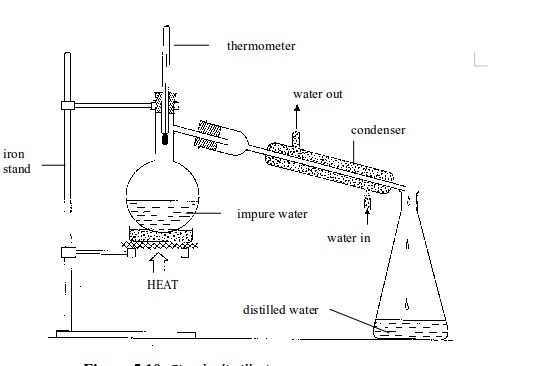
Simple distillation
5. Fractional distillation
Separating
the liquids from a mixture of two (or more) miscible liquids is again
based on the fact that liquids will have different boiling points.
However, the boiling points are closer together than for solid-in-liquid
solutions. It is difficult to separate mixtures of liquids whose
boiling points differ by only a few degrees. In this case, fractional
distillation is used.
For
example, ethanol boils at 78°C whereas water boils at 100°C. When a
solution of ethanol and water is heated, ethanol and water vapours
enters the fractionating column. Evaporation and condensation take place
as the vapours rise up the column. Ethanol passes through the condenser
first as the temperature of the column is raised above the boiling
point. Water condenses in the column and flows back into the flask
because the temperature of the column is below its boiling point of
100°C.
The
temperature on the thermometer stays at 78°C until the ethanol has
distilled over. Eventually, the thermometer reading rises above 78C°.
This is a sign that all the ethanol has been separated, so heating can
be stopped. By watching the temperature carefully, the two liquids
(fractions) can be collected separately.
Various
forms of fractionating column can be used. Their general purpose is to
provide surfaces, e.g. flat discs, on which ascending vapour can
condense. Glass beads in the column provide a large surface area for
condensation.
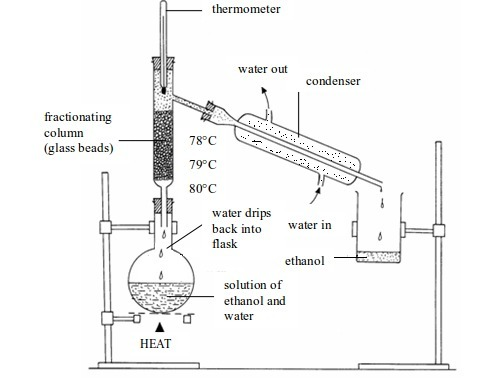
Fractional distillation
6. Sublimation
This
is a technique used to separate a mixture of solids where one of the
solids sublimes. Examples of solids which sublime are ammonium chloride,
iodine, solid carbon dioxide and naphthalene. A mixture of any of these
solids with another solid can be separated by sublimation.
Let
us consider a mixture of iodine and sodium chloride. The mixture is
placed in a beaker and covered with a filter funnel as shown in the
diagram below. Then, as the mixture is heated, the ammonium chloride
sublimes. The ammonium chloride vapour rises and condenses on the cooler
walls of the filter funnel. The sodium chloride is left in the beaker.
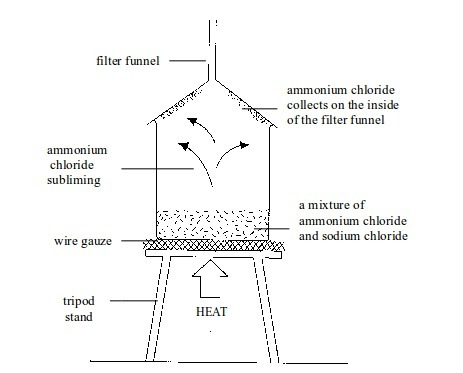
Sublimation of ammonium chloride
7. Chromatography
This
method is commonly used to separate a mixture of coloured substances
(solids or dyes). An example of this is the separation of dyes that make
up black ink. Chromatography works better when a solvent is used. The
commonest solvent is water, though other solvents such as ethanol or
ether may be used for those substances that do not dissolve in water.
There are two types of chromatography, namely column chromatography and paper chromatography.
The two types of chromatography follow the same principle, but paper
chromatography is the simplest form to set up, and hence is more
commonly used. On which principle does chromatography work? Let us
consider an example of separating dyes that make up black ink. In this
case, water is used as a solvent.
Separating dyes in ink
Procedure
- Put a small spot of the water-soluble ink onto a strip of filter paper as shown in figure bellow
- Place the filter paper in a beaker of water. Make sure the level of the water is below the level of the ink spot.
- Leave the filter paper until the water has risen to the top of the paper.
- Remove the paper and allow it to dry.
- Note the colours the ink contains.
Observation
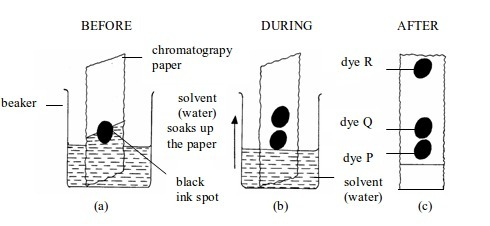
Separating the components of black ink by paper chromatography
As
the solvent (water) moves up the paper, the dyes are carried with it
and begin to separate. They separate because they have different
solubilities in water and are absorbed to different degrees by the
filter (chromatography) paper. As they rise, they are gradually
separated.
Findings
The
different colours of the ink make a pattern of colours formed during
the process of chromatography. This pattern of colours is called a
chromatogram.
Figure
aboveshows a chromatogram of black ink. The blue ink has the fastest
speed. This means it is the most soluble in water and least absorbed by
the paper. The green ink has travelled least. This means it is the least
soluble in water and most absorbed by the paper.
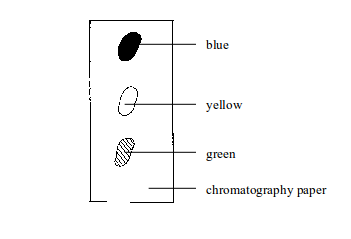
Paper chromatography showing the separated components of black ink
Uses of Chromatography
Chromatography is used in many different ways. The following are some of the application of chromatography:
- It can be used to find out the components of a liquid or solid, or even to identify different substances.
- It can be used by security agents and medical personnel to analyse blood and urine samples.
- Causes of pollution in water and in animals that live in water can also be detected using chromatography.
- In chemistry, chromatography is used to test the purity of substances and in separation of mixtures.
8. Layer separation
Mixtures
of two immiscible liquids can be separated with a separating funnel.
The mixture is placed in a separating funnel and allowed to stand. The
liquids separate into two different layers. The lower denser layer is
then "tapped" off at the bottom.
For
example, when a mixture of kerosene and water is poured into the
funnel, the kerosene floats to the top as shown in figure above. When
the tap is opened, the water runs out. The tap is closed again when all
water has gone, leaving the kerosene in the funnel.
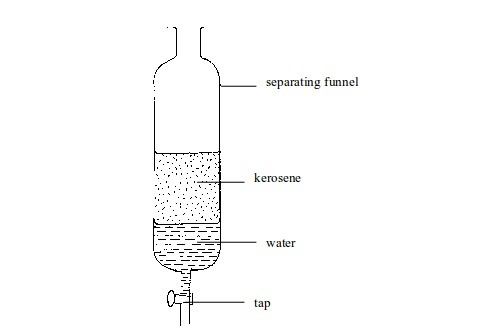
Separating immiscible liquids
9. Solvent extraction
Solvent
extraction, also known as liquid-liquid extraction, refers to the
separation of materials of different chemical types and solubilities by
selective solvent extraction. That is, some materials are more soluble
in one solvent than in another. The method is used to refine petroleum
products, chemicals, vegetable oils, and vitamins.
This
method is used is to separate a solid from a solution in which there is
more than one solid dissolved. An example of this is a water solution
of iodine and sodium chloride.
EXPERIMENT:Separating iodine from sodium chloride by solvent extraction.
Method
- Put the solution into a separating funnel as shown in figure (a).
- Add ethoxyethane. This forms a layer on top of the solution (b). The ethoxyethane is called the extracting solvent.
- Stopper the separating funnel and shake well figure (c). The iodine, which is more soluble in the ethoxyethane, passes into the ethoxyethane layer. The sodium chloride remains in the water layer.
- The water layer is run off into a beaker followed by the ethoxyethane layer into another beaker (Caution: Remove the stopper before opening the tap).
- The ethoxyethane is then evaporated off by simple distillation. Similarly, the water layer can be evaporated to yield sodium chloride.
The solvent extraction works on two principles:

Separating iodine from sodium chloride by solvent extraction
- One solid in the solution must be more soluble in the extracting solvent than the other.
- The extracting solvent must not be miscible with the solvent in which the mixture of solids is dissolved. Neither should it react with it.
10. Centrifugation
A
centrifuge is used to separate small amounts of suspension.
Centrifugation is used with insoluble solids where the particles are
very small and spread throughout the liquid. In centrifugation, test
tubes containing suspensions are spun round very fast. The solid gets
thrown to the bottom. Here, it is no longer the force of gravity on the
solid that causes settling.
Instead,
there is a huge centrifugal force acting on the particles due to the
high speed spinning of the samples. This causes the solid to be
deposited at the bottom of the centrifuge tube.
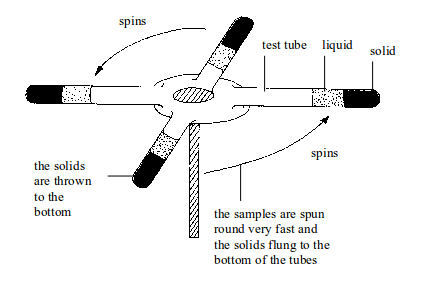
Separation by centrifugation
After centrifugation, the liquid can be decanted (poured out) from the test tube, or removed with a small pipette.
This makes the solid to be left behind.

The solid after centrifugation
11. Magnetic separation
If
the solid mixture contains iron, the iron can be removed using a
magnet. This method is used to separate scrap iron from other metals.
Magnetic iron ore can be separated from other material in the crushed
ore by using an electromagnet. In the process of recycling metals, iron
objects can be picked out from other scrap metals using electromagnets.
12. Crystallization
This
process involves evaporation but the speed of evaporation is much
slower. In principle the salt solution can be left in the evaporating
basin for a long period until all the water has evaporated but in
practice this takes longer time. The process begins by evaporating away
the liquid. However, because the crystals are needed, evaporation is
stopped after the solution has been concentrated enough. The
concentrated solution is allowed to cool slowly and crystallize. The
crystals so formed can be filtered off and dried. A similar process is
used to extract salt from the sea. Salty sea water is placed in wide
basins and put in the sun. Water evaporates off, leaving the salt
crystals in basins.
13. Winnowing or threshing
This
is a method used to separate grains from husks or bran. The process
makes use of the differences in density of the constituents in the
mixture. When the winnower is shaken around, grains, being denser than
husks or bran, sink to the bottom of the winnower
The
less dense husks or bran moves to the top. They are then blown off the
winnower by wind or breath, or sometimes picked by hand and separated
from the grains.
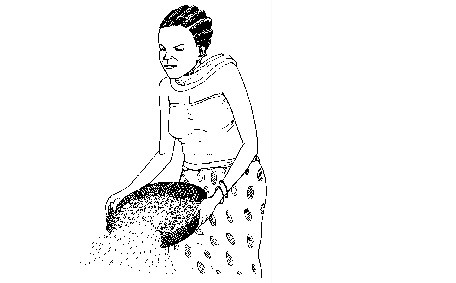
Separating thresh from grains by winnowing
The Significance of Separating Different Mixtures
Explain the significance of separating different mixtures
We
separate mixtures in order to obtain the mixture constituents and put
them into appropriate use. The world around us is made up of mixtures of
different substances. These substances are often of little use when
they are in the form of a mixture. For this reason, separation of the
individual components of mixtures is deemed inevitable.
1. (i) Fractional distillation
Is
used industrially to separate the various fractions of crude oil such
as natural gas, petrol, kerosene, diesel, lubricating oils, waxes,
asphalt and bitumen. All these fractions have a significant use in man’s
industrial, domestic and commercial activities. The functions or use of
all these fractions is well known to everyone of us. Can you mention
the functions of each fraction? You will learn more about these products
in organic chemistry section.
(ii) Fractional distillation of liquid air
Separates
the air into its component gases. This is important because these
components have many uses in our everyday life. Some of these fractions
and their functions are summarized below:
| Component | Use |
| Nitrogen | Manufacture of fertilizer |
| Oxygen | Used in hospitals, steel making, diving and space travel |
| Argon | Filling light bulbs |
| Carbon dioxide | Fire extinguishing, used in carbonate drinks, etc. |
| Helium | Filling airships and water balloons |
| Krypton and Xenon | Used in photographic flash lamps |
2. Filtration and purification of drinking water make use of processes such as decantation, filtration and sometimes distillation. The bottled water we drink is prepared by some or a combination of these processes.
3. In mining, an electromagnet is used to separate magnetic iron ore from other materials in the crushed ore.
4. In the manufacture of ethanol by fermentation in breweries, distillation
is used in the final stage to purify ethanol to its purest form
(surgical spirit) in which the ethanol is usually sold. Likewise,
distillation of fermented starch (8-12% ethanol), yields alcoholic
drinks called sprits (whisky, gin, brandy, rum) which contain about
35-40% ethanol.
5. (i) Paper chromatography
is very useful in analysis of substances present in a solution. For
example, it can tell whether a substance has become contaminated or
otherwise. This can be very important, because contamination of food or
drinking water, for instance, may be dangerous to our health.
(ii) Chromatography has
proved very useful in the analysis of biologically important molecules
such as sugars, amino acids, and nucleotide bases. Molecules such as
amino acids can be seen if the paper is viewed under ultra- violet
light.
(iii) Paper chromatography
is the test that can be used to check for the purity of a substance. If
the sample is pure, it should only give one spot when run in several
different solvents.
6.
Other separation methods are also used to check whether purification
has been successful. Samples obtained by distillation can be
re-distilled. The purity of crystals can be improved by
re-crystallisation. A water sample can be tested for amount of dissolved
material by evaporating a certain amount of water to dryness.
The solid waste can be weighed. This would give the amount of dissolved
solid in the water.
The
process of purification is of crucial importance in many areas of
chemical industry. Medical drugs (pharmaceuticals) must be of highest
possible degrees of purity. Any contaminating substances even in very
small amounts may have harmful side effects.
7. (i) Separation of cream from whole milk is done by the process of centrifugation.
As the milk is spun, the heavier contents are forced down and the
lighter cream rises up. After centrifugation, the cream is poured off
the top by decantation. This is the initial stage of milk constituent
separation, after which other components such as milk proteins (cheese)
are separated.
(ii)
Centrifugation is applicable in blood analysis, where the solid part of
blood is separated from the liquid part by centrifugation. Blood is a
suspension containing microscopic blood cells (corpuscles) in a liquid
called plasma. If blood is centrifuged in a test tube, the blood cells are flung to the bottom, leaving the liquid plasma on top.
8.
Knowledge of separation of two immiscible liquids can be applied in the
extraction of metals such as iron from their ores. For example, at the
base of the blast furnace, the molten slug forms a separate layer on top
of the liquid iron. The two can then be "tapped" off separately. The
method is very useful in organic chemistry as part of the process called
solvent extraction.
9. Evaporation
process is used in the extraction of common salt from seawater whereby
the sun evaporates water molecules from salty water, leaving crystals of
the salt behind.
10. Layer separation technique is applied in the recovery of liquids from contaminants.
11. Solvent extraction
process is applied in the extraction of certain edible oils from seeds,
and in the extraction of some metals from sludge mixture.
The Components of Different Mixtures using Different Methods
Separate the components of different mixtures using different methods
Activity 1
Separate the components of different mixtures using different methods.
TOPIC 6: AIR COMBUSTION, RUSTING AND FIRE FIGHTING.
Composition of air
Air
is a mixture of different gases. The gases that make up the air include
nitrogen, oxygen, carbon dioxide, noble gases (argon, helium, neon,
krypton and xenon) and a little water vapour. Air may also contain
traces of impurities such as carbon monoxide (CO), sulphur dioxide (SO2), hydrogen sulphide (H2S)
and other gases. The presence of these gases in air results in air
pollution. Table bellow shows the composition of air by volume. The
proportion of water vapour and impurities in air is very variable.
The Gases Present in Air and their Proportions
Name the gases present in air and their proportions
The
composition of air is not exactly the same everywhere. It changes
slightly from day to day and from place to place. There is more water
vapour in the air on a damp day and in air above water bodies such as
oceans, seas, lakes, rivers, etc. Over busy cities and industrial areas
there is more carbon dioxide. But the uneven heating of the earth's
surface by the sun causes the air to move continually, resulting in
winds. The resultant winds spread the pollutants around.
The percentage composition of air by volume
| Gas | Approximate percentage |
| Nitrogen | 78.00% |
| Oxygen | 21.00% |
| Noble (rare) gases mainly argon | 0.94% |
| Carbon dioxide | 0.03% |
| Water vapour | 0 – 4% |
The Presence of Different Gases in Air
Demonstrate the presence of different gases in air
The determination of air by mass was carried out by Dumas in 1841. The apparatus used consists of three units as shown bellow.
The three parts of the apparatus include the following:
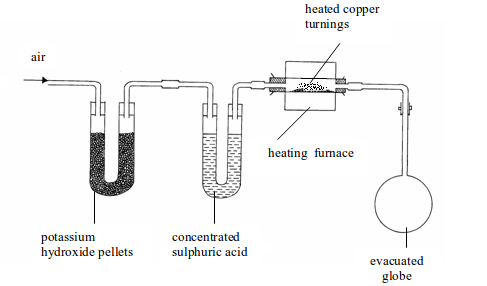
Determination of the composition of air by weight
- Several U-tubes containing potassium hydroxide pellets to remove carbon dioxide (only one tube shown in the figure for simplicity).
- Another set of U-tubes containing concentrated sulphuric acid to remove water vapour (only one tube shown in the figure).
- A heated, weighed glass tube containing finely divided copper to absorb oxygen.
The
three parts of the apparatus would, therefore, remove all carbon
dioxide, water vapour and oxygen contained in air. The remaining gas
which enters the weighed evacuated flask (globe) will be atmospheric
nitrogen and, of course, plus the rare gases. The copper will have
reacted with all oxygen to form copper (II) oxide. The increase in mass
of the copper will give the mass of oxygen. The increase in weight of
the globe will be due to the weight of nitrogen and the rare gases. If
we neglect the weight of carbon dioxide, the percentage of oxygen by
mass (weight) in dry, pure air is 23.2% and the remaining 76.8% is the
percentage of nitrogen and rare gases.
The presence of nitrogen in air
In
order to demonstrate the presence of nitrogen in air, we need to carry
out an experiment that will convert the nitrogen of the air into a
chemically recognizable substance. This is easily done by strongly
heating magnesium in the residual gas from the above experiment.
Magnesium and nitrogen will react thus:
Upon
treatment with water, magnesium nitrite gives ammonia gas. The gas can
be recognized by its characteristic smell and its action of turning red
litmus paper to blue.
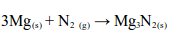
The presence of oxygen in air
Oxygen
is known as the active portion of the air because it supports
combustion and combines with many other substances. Its presence and
composition in air can be determined by using these properties. Any of
the following two (2) experiments can be used to determine the
composition, by volume of oxygen contained in air.
The Percentage of Oxygen in Air Experimentally
Determine the percentage of oxygen in air experimentally
1. Experiment. Determination of the presence and proportion of oxygen in air by combustion of a candle
Method
- Place a small candle on a plastic lid or any object that can float. Then set up the apparatus as shown in figure bellow. Sodium hydroxide is used in order to absorb the carbon dioxide gas produced by a burning candle.
- Light the candle and place the measuring cylinder over the top. Note the level of sodium hydroxide solution in the measuring cylinder at the start. A candle will stop burning (go off) once all the oxygen in the cylinder is used up.
- When the candle goes off, leave the apparatus to cool to room temperature. The purpose of cooling is to let the heated and expanded air to return to its normal condition. Then note the level of sodium hydroxide solution in the measuring cylinder.
.
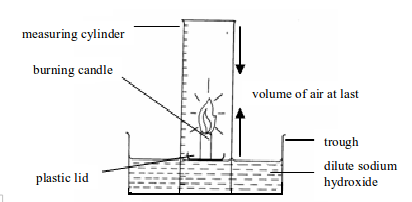
Determining the presence and percentage composition of oxygen in air by burning a candle
Observation and findings
The
oxygen in air enclosed in the measuring cylinder is used to burn the
candle to produce carbon dioxide gas. The carbon dioxide so produced
dissolves in sodium hydroxide solution. The dissolved carbon dioxide
causes the level of sodium hydroxide solution to rise up. The oxygen gas
used to burn the candle is practically equal to the amount of carbon
dioxide produced. This fact is, therefore, used to calculate the
percentage of oxygen in air.
Model results
In the experiment, the initial volume of air was found to be 70.5 cm3 and the final volume was 55 cm3. The percentage of oxygen in the air is calculated in two steps:
1.
To find the volume of oxygen used up to burn the candle (which is
practically equal to the volume of carbon dioxide produced and then
absorbed by sodium hydroxide), we subtract the final volume of air from
the initial volume
Volume or oxygen used = Initial volume of air – final volume of air
Therefore, the volume of oxygen used for combustion of the candle = 14.7 cm.

Alternatively,
the volume of oxygen used up can be calculated by subtracting the
initial volume of sodium hydroxide solution from the final volume. That
is: Volume of oxygen used = final volume of sodium hydroxide – initial
volume of sodium hydroxide = Volume of carbon dioxide dissolved in
sodium hydroxide.
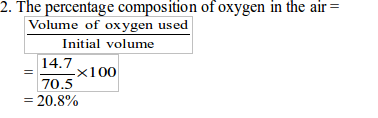
Therefore, the percentage of oxygen =
In practice, it is difficult to get an accurate result with the above experiment.

This is due to a number of reasons such as:
- Not all the carbon dioxide is absorbed by the sodium hydroxide.
- The candle may go out (stop burning) before all the oxygen is used up due to accumulation of carbon dioxide in the cylinder.
- The heating of the air inside the measuring cylinder causes the gases to expand. This is why it is essential that the gases be allowed to cool to room temperature before reading the level.
Experiment withcombustion of copper in airgives
the more accurate results than the combustion of the candle. The copper
reacts with oxygen in the air to give copper (II) oxide.
2. Experiment . Determination of the presence and proportion of oxygen in air by the combustion of copper in air
Method
- Set up the apparatus as shown in figure bellow. Syringe A should contain 100 cm of air, syringe B should be empty.
- Heat the copper strongly and pass the air from syringe A back and forth (by pushing the piston of the syringe inward and outward) over the copper turnings a few times. Allow the air to cool and measure the volume of air in syringe A.
- Repeat the heating and cooling until the volume of air that remains in syringe A is constant. The copper is heated and cooled several times to ensure that it reacts with all oxygen in the sample of air.
`
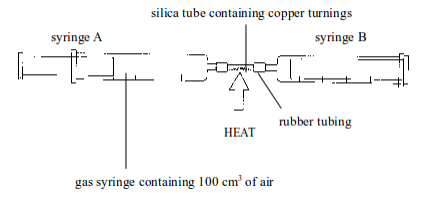
Determining the presence and percentage composition of oxygen in air by heating copper
Observations and findings
2.
The final volume of air in the syringe, at the end of the experiment,
is less than that of the original volume. This is because oxygen in the
original air has combined with copper
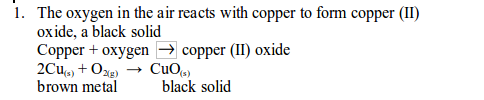
Model of result
The volume of air in the syringe at different heating and cooling is as shown below:
Initial volume before heating = 100
Volume after first heating and cooling = 82
Volume after third heating and cooling = 79
The volume of oxygen used up = Initial volume of air before cooling - volume of air after the last heating and cooling
= 100 - 79
= 21
The presence of carbon dioxide in air

Carbon
dioxide is present in air to the extent of 0.03% by volume. The gas is
formed during the combustion of all common fuels – wood, coal, coke,
natural gas, petrol, diesel, paraffin oil, etc, all of which contain
carbon.
It
is breathed out as a waste product of respiration by all animals. All
sorts of combustion and burning produce carbon dioxide. The gas produced
by all these processes accumulates in air. However, the amount of
carbon dioxide in air remains constant instead of the tremendous
quantities released into the atmosphere. This is because plants take up
carbon dioxide. They then convert it into complex starchy compounds
during photosynthesis. The gas also dissolves in ocean water and other
water bodies.
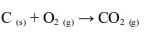
The
presence of carbon dioxide in air can be shown by passing air through a
test tube containing some limewater (figure 6.5). After a time, the
limewater turns milky. This shows the presence of carbon dioxide.
The reaction involved is as follows:
``
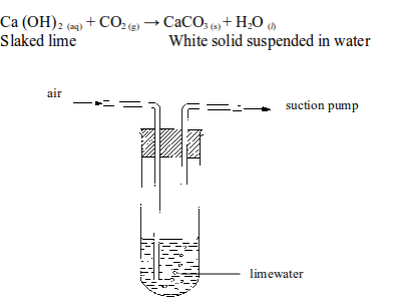
Testing for the presence of carbon dioxide in air
The presence of water vapour in air
Water
vapour is present in air in varying quantities. It is given off by
evaporation from the oceans, lakes and rivers. The presence of water
vapour in air can be demonstrated by exposing deliquescent substances to
the air on a watch glass. These are substances which when exposed to
air tend to absorb much moisture from the air, dissolve in that
moisture, and finally form a solution. Examples of deliquescent
substances include calcium chloride, sodium hydroxide and phosphorous
pentoxide.
The
resulting solution is distilled. The colourless liquid obtained from
distillation may be proved to be water by various water tests such as
use of cobalt chloride paper or anhydrous copper (II) sulphate. The
cobalt chloride paper turns from blue to pink in the presence of water.
The white anhydrous copper (II) sulphate turns blue. Any of the two
tests confirms the presence of water.
Alternatively,
one may expose the anhydrous copper (II) sulphate salt to open air
straight away for quite some time and then observe any change in its
colour and/or form. Upon absorption of water vapour from the air, the
white, powdery and anhydrous copper sulphate salt turns into hydrated
blue crystals.
The noble (rare) gases
About
1% of the air by volume is made up of the noble gases. The most
abundant of the noble gases is argon. Others are neon, xenon, krypton
and helium. The proportion of these four is very minute. Argon and neon
are used in “gas-filled” electric light bulbs and coloured “neon”
electrical signs. They are obtained from liquefied air.
Air pollutants
The
air always contains small quantities of many gases. Such gases include
hydrogen sulphide, sulphur dioxide, as well as dust and other solid
particles, especially in industrial areas. These gases are given off
during the combustion of coal, and the fuels resulting from coal.
SEPARATION OF AIR INTO ITS CONSTITUENT GASES
The
air we breathe is necessary to keep us alive. It is also a chemical
resource. Oxygen is used in steel making, and nitrogen is used in making
fertilizers. To use these gases in this way, they must be separated
from the atmospheric air. Air, as we studied in chapter 5, is a mixture
of different gases. The method used to separate its constituent gases is
fractional distillation. The gases have to be liquefied so that the
mixture can be fractionally distilled.
The
process of separating the air into its constituent gases is difficult.
It cannot be done in the laboratory. It is only done in industry. The
chemical industry needs the gases from the air in their pure form.
The fractional distillation of air involves essentially two stages:
- First, the air must be cooled until it turns into a liquid.
- Then, the liquid air is allowed to warm up again. The various gases boil off at different temperatures
Stage 1: Liquefaction of air

- Air is filtered to remove any dust particles (purification).
- The air is cooled to -180°C to remove the water vapour and carbon dioxide.
- The air is then compressed to 100-150 atmospheres. As the compressed air gets very hot, it has to be cooled.
- The compressed cooled air is allowed to expand rapidly. The rapid expansion cools the air to very low temperatures, and the liquid drops out. At -200°C, only helium and neon remain as gases. The cold gases are used to cool the compressed air.
Stage 2: Fractional distillation of liquid air
The
air is cooled and compressed to form liquid air. The liquid air is
allowed to warm up. Nitrogen boils off first because it has a low
boiling point, -196°C. Argon follows by boiling at -186°C and finally
oxygen at -183°C
Figure above illustrates all the steps that take place during the process.
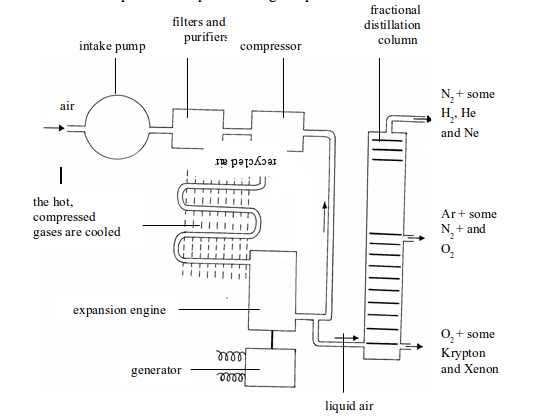
Fractional distillation of liquid air
Combustion
The Concept of Combustion
Explain the concept of combustion
Combustion
of a substance in oxygen or air is so common that it becomes almost a
habit to use the word "combustion" as if it referred to this kind of
reaction alone. In real sense, it may be applied to any chemical
reaction accompanied by light and heat in which one or more of the
reactants are gaseous.
Many
common substances burn in air. Substances such as coal, wood, kerosene,
petrol, etc, burn in air. Any substance that burns is called a
combustible material. The air or oxygen that supports the combustion is
called a supporter of combustion. This is because we live in an
atmosphere of air that contains oxygen, which is a very reactive gas.
The gas surrounds any burning material. Oxygen is regarded as a
supporter of combustion. However, it can sometimes combine chemically
with the burning substance to produce a new substance, as we shall see
later.
Combustion
of a substance involves its reaction with oxygen and the release of
energy. These reactions are exothermic and often produce a flame. An
exothermic reaction is the one that is accompanied by release of heat to
the surrounding environment. Combustion in which a flame is produced is
described as burning. During burning energy is given out in the form of
heat, light and sound.
The Combustion of Different Substances in Air and Analyse the Products
Demonstrate the combustion of different substances in air and analyse the products
Many different substances burn in air to produce different products. Here are examples of combustion of some common substances:
Sulphur
This is a yellow powder. When burnt in air, it gives misty fumes of sulphur dioxide gas.

Copper
When
a piece of copper foil in a pair of tongs is held in a Bunsen flame, it
becomes red-hot. On cooling, a black layer of some substance is
observed. This black substance is copper oxide. The reaction occurs
thus:
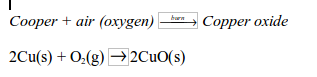
Magnesium
When
one end of a piece of magnesium ribbon in tongs is placed in a Bunsen
flame, it burns with a dazzling flame leaving a white ash. This white
ash is magnesium oxide.

Hydrocarbons
Candle
wax is a hydrocarbon. When it burns in air, the carbon and hydrogen of
the wax react with the oxygen of the air to give carbon dioxide and
water vapour respectively.
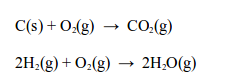
These
are substances containing carbon and hydrogen only. The burning of
these organic substances produces carbon dioxide and water vapour as the
main products. If oxygen supply is low, combustion is incomplete and
carbon monoxide may be formed.
Coal
Coal is a solid fuel that will burn in air to give the following products:

The Application of Combustion in Real Life
Describe the application of combustion in real life
1.
The combustion of a natural gas is an important source of energy for
homes and industry. Natural gas is mainly methane. Its complete
combustion produces carbon dioxide and water vapour.

Substances like methane, which undergo combustion readily and give out large amount of energy, are known as fuels.
2.
There are some reactions where fuels and other substances burn to
produce a flame. These are combustion reactions. There are also other
combustion reactions (exothermic) where no flame is evident. The most
important of these is the crucial biochemical reaction that releases
energy in our body cells called cellular respiration.
Our
bodies need energy to make possible the reactions that take place in
our cells. These reactions allow us to carry out our everyday
activities. We need energy to stay alive. We get this energy from food.
During digestion, food is broken down into simpler substances. For
example, the carbohydrates in rice, potatoes and bread are broken down
to form glucose. The combustion of glucose with oxygen in the cells of
our body provides energy.

The reaction is exothermic and is known as cellular respiration.
3. We combust fuels to heat homes and keep ourselves warm, cook our food, and even burn wastes.
4.
Combustion of fuels in automobile engines produces power (energy). This
energy is supplied to different parts of motor vehicles to make them
move from one point to another or carry out some crucial activities such
as grinding, pumping, hauling etc. The operation of such machines could
be impossible without combustion of fuel that produces energy to make
them work.
5. Combustion of fuel in different burners produces heat and light used for different purposes in a chemistry laboratory.
6.
Extraction of metals: Moderately reactive metals such as zinc, iron and
lead are roasted in a special furnace (kiln) to form oxides. The
resulting oxides are then reduced with carbon to get the pure metal.
This process of extracting a metal from its ore by heating is called smelting.
7.
In metallurgical industry, combustion is used during welding. Welding
is the process of joining metals by melting the parts and then using a
filler to form a joint. It can be done using different energy sources,
including a gas flame.
Fire fighting
Firefighting
is the act of extinguishing destructive fires. A fire fighter fights
these fires to prevent destruction of life, property and the
environment. Firefighting is a highly technical profession that requires
training and education in order to become proficient.
Types of Fires According to their Causes
Classify types of fires according to their causes
Before
starting to fight the fire, it is important to know the size and type
of the fire that you are going to put off. The kind of firefighting
material you are going to use will also depend on the type of fire in
question. Fires are classified based on the type of burning materials.
1. Class A fires
These
are the fires in which the burning materials are ordinary combustible
materials such as paper, wood, cardboard, coal, rubber, clothing,
furniture and most plastics. Water is the best extinguisher for these
fires. However, any other type of extinguisher, except carbon dioxide,
may be used.
2. Class B fires
These
fires involve flammable liquids such as petrol, kerosene, oil, alcohol,
ether, vanishes, etc. For small fires, a fire blanket or sand may be
used. If the fire is large, use foam, dry powder or carbon dioxide
extinguisher. Water should not be used on class B fires because the
burning material, being lighter than water, will just float and spread
the fire further.
3. Class C fires
The
burning material involves flammable gases e.g. hydrogen, acetylene,
coal gas, butane, methane, propane, etc. The best extinguishers to use
in fighting against these fires are foam, dry powder or carbon dioxide
extinguishers. It is important to turn off the gas supply, and spray
water on the gas tank to cool it down.
4. Class D fires
The
burning material is a metal. Alkali metals such as sodium or potassium
may catch fire when they come in contact with water and oxygen. At high
temperatures, many metals react with oxygen vigorously. Fires that
involve burning metals should not be extinguished by water. This is
because the burning metal can react with water to give hydrogen (another
potential fuel). The appropriate extinguisher to use is foam or dry
powder extinguisher.
5. Class E fires
These
fires involve electrical equipment such as appliances, wiring, circuit
breakers and outlets. You may use carbon dioxide or dry powder
extinguisher to put off these fires. Never use water as it can conduct
electricity and give an electric shock. Also remember to switch off
power from the mains.
6. Class F fires
The
burning material is cooking oil or fat. A cooking oil fire in the
kitchen can be extinguished by covering the pan with a fire blanket or
damp cloth. Foam, dry powder or carbon dioxide extinguishers also work
by cutting off the air supply to the fire. For large fires, wet chemical
extinguishers are recommended.
Different Types of Fire Extinguishers used to Extinguish Different Types of Fire
Identify different types of fire extinguishers used to extinguish different types of fire
Before
choosing the best fire extinguishers for fighting different types of
fires it is crucial to identify the type of burning materials first, and
hence the type of fire such as:
Class A: Solids such as paper, wood, clothing, rubber, etc
Class B: Flammable liquids such as paraffin, petrol, oil, spirit, alcohol, etc.
Class C: Flammable gases such as propane, butane, methane, hydrogen, etc
Class D: Metals such as aluminium, magnesium, titanium, etc
Class E: Fires involving electrical equipment such as appliances, circuit breakers and outlets, etc.
Types of fire extinguisher to use for each type of fire
Water extinguisher
This
is the cheapest and most widely used fire extinguisher. It is used for
class A fires. It is not suitable for class B (liquid) fires, or where
electricity is involved.
Foam extinguisher
This
is more expensive than water extinguisher, but more versatile. It is
used for classes A and B fires. Foam spray extinguishers are not
recommended for fires involving electricity, but are safer than water if
mistakenly sprayed onto live electrical apparatus.
Dry powder extinguisher
This
is often termed as “multi-purpose” extinguisher, as it can be used on
classes A, B and C fires. It is the best for liquid fires (class B). It
will also efficiently extinguish class C (gas) fires. However, take care
because it can be dangerous to extinguish a gas fire without first
isolating the gas supply. Special powders are available for class D
fires.
When
powder-type extinguishers are used indoors, the powder can obscure
vision or damage goods and machinery. It is also very messy.
Carbon dioxide extinguisher
Carbon
dioxide is ideal for fires involving electrical apparatus (class E). It
will also extinguish class B (liquid) fires. However, the extinguisher
has no post-fire security and the fire could re-ignite.
Wet chemical extinguisher
This
is a special extinguisher for class F fires. The extinguisher contains
potassium salts. The salts not only help to cool down the flames but
also form a ‘saponification’ blanket that effectively smothers the
flames with thick, soapy foam.
Specialist powder extinguisher
This
is a specialist fire extinguisher for use on class D fires (fires on
combustible metals such as sodium, potassium, magnesium, lithium,
titanium, manganese and aluminium), especially in the form of powder or
turnings.
The Components Needed to Start a Fire
State the components needed to start a fire
To
extinguish fire, it is necessary to remove one or more of the three
components of combustion. Any fire needs a fuel, oxygen (air) and heat
to keep it going. Remove any one of them and the fire will go out. These
components are as shown in the fire triangle below.

The fire triangle
A fire will continue or start to burn if these components are present:
(i) Fuel:
This refers to any combustible material be it solid, liquid or gaseous
material provided it can catch fire and burn. You can stop fire by
removing the combustible material from the path of fire.
(ii) Oxygen (air):
Oxygen supports combustion. A fuel will only burn if there is
sufficient supply of oxygen. You can extinguish fire by displacing, or
taking away oxygen supply from the fire or by blocking the gas supply to
the fire.
(iii) Heat:
The temperature should be at the kindling point of that fuel or above
it. Every fuel has its own kindling point. Below the kindling point, the
fuel will not catch fire. You can put out fire by lowering the
temperature below the kindling point of a particular fuel. Water may be
used to cool down the fuel. The vapourization of water absorbs the heat;
it cools the smoke, air, walls, objects etc, which could be used as
further fuel.
Fire Extinguishers According to the Chemicals they Contain
Classify fire extinguishers according to the chemicals they contain
Fire extinguishers are classified according to the type of chemicals they contain
1. Liquid carbon dioxide extinguisher
This
extinguisher contains liquid carbon dioxide. The liquid is contained in
a metal container. When the safety pin is removed, carbon dioxide
evaporates as solid "snow" (carbon dioxide sublimes). The snow settles
on the fire and suffocates it.
2. Soda-acid extinguisher
This
extinguisher has a metal case containing soda (aqueous sodium carbonate
or sodium hydrogen carbonate). In the metal case there is a glass
bottle containing a concentrated acid (sulphuric or hydrochloric acid).
There is a knob attached to the top of a metal case. Hitting this knob
breaks the acid bottle thus bringing the acid and the soda into contact.
The two react to give carbon dioxide, e.g.

The
gas forms bubbles with the solution, thereby forming foam which is
forced out of a jet of the case. The foam is directed to the fire where
it covers the burning liquid, excluding all air from reaching the fire.
Some
extinguishers are made in such a way that turning them upside down
brings the soda and acid into contact and the reaction proceeds as
stated above.
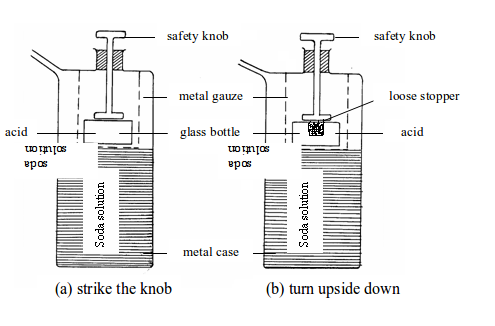
Soda-acid fire extinguishers
3. Foam extinguishers
This
is different from the soda–acid type in that it contains sodium
hydrogen carbonate in the metal case, but instead of the concentrated
acid, it contains aluminium sulphate and saponium in the glass bottle.
On mixing the three components, carbon dioxide gas is produced. The gas
is ejected out as foam. The foam here lasts longer than the foam in the
soda–acid extinguisher. The foam so produced also keeps air away from
the burning material.
4. Dry chemical extinguisher
This
extinguisher uses powdered sodium hydrogen carbonate and a nitrogen gas
kept at high pressure. When the gas cartridge is broken using the top
cap, the carbon dioxide under pressure propels the powder. The powder
forms a layer over the burning material to keep air away.
Table
bellow summarizes the types of fire extinguishers, indicating the
chemicals they contain and the classes of fire they are suitable or
unsuitable for.
Table: Types fire extinguishers and the chemical composition of their extinguishing agents
| Type | Chemical composition of agent | Suitable for | Unsuitable for |
| APW (Air- pressurized water) | Ordinary tap water pressurized with air | Class A | Class B, C, D and E (will spread the flame and make the fire bigger!) |
| Dry chemical(DC) | Fine sodium bicarbonate powder pressurized with nitrogen | Class A, B, C and E | - Class D- Aircraft and electronics ( corrosive to metals such aluminium)Note: -Though it is safe to use indoors it can obscure vision |
| CO2 | Non-flammable carbon dioxide gas under extreme pressure | Class B, C and E | Class A (leaves a flammable substance on the extinguished material which canre-ignite later ) |
| Halon | Bromochloro-difluoro-methane | Class A and E | Class B and C (least suitable) |
| Foam | Proteins and fluoro-proteins | Class A and B | Class E |
| Wet chemical(WC) | Potassium acetate | Class F | Class E |
| ABC | Mono-ammonium phosphate with a nitrogen carrier | Class A, Class B and C | Electronic equipment (leaves a stick y residue that may be damaging to electrical appliances such as a computer) |
| Specialist powder (SP) | Powders of NaCl, Cu or graphite under extreme pressure | Class D | Class A, B, C, E and F |
Precautions on using fire extinguishers
The following are some safety precautions you have to keep in mind when using fire extinguishers:
- Keep a reasonable distance from the fire as it may suddenly change direction.
- Never use a portable extinguisher on people, instead use a fire blanket.
- Do not test a portable extinguisher to see if it works. It may leak and later fail to work during an emergency.
- Do not return a used portable extinguisher to the wall. Make sure it is recharged first.
- When a fire gets out of control, notify the nearest fire brigade.
Extinguishing Small Fires Using the Right Types of Fire Extinguishers
Extinguish small fires using the right types of fire extinguishers
Activity 1
Extinguish small fires using the right types of fire extinguishers
The Concept of Rusting
Explain the concept of rusting
Rusting
is the name given to the oxidation of iron or steel in damp air. It is
also called corrosion. Rust is hydrated iron (III) oxide. It is a soft,
crumbly solid and hence weakens the structure of iron and steel. During
rusting, iron reacts with oxygen to form brown iron (III) oxide
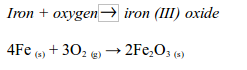
At the same time the iron (III) oxide reacts with water to form hydrated iron (III) oxide (or rust):

Note: The x in
the equation indicates that the number of water molecules in the
hydrated iron (III) oxide can vary. So, both oxygen and water are
needed to cause rusting of iron.
Rusting
is a serious economic problem. Large sums of money are spent each year
to replace damaged iron and steel structures, or protecting structures
from such damages. Rusting of bridges, corrugated iron sheets on house
roofs, containers, articles, etc. require an expenditure of big sums of
money as well as labour for replacement. Rust weakens structures such as
car bodies, iron railings, and ships’ hulls, and shortens their useful
life. Preventing it can cost a lot of money. All efforts must be made to
stop iron or steel items from rusting. This can be achieved if we know
the conditions necessary for iron to rust.
The Conditions Necessary for Iron to Rust
Demonstrate the conditions necessary for iron to rust
When
iron is left in contact with both water and oxygen (or air), it reacts
to form hydrated iron (III) oxide. Iron will not rust on exposure to dry
air or air-free water (water that has been boiled to expel all
dissolved air) only. However, iron will easily and readily rust in water
that has dissolved air in it. In figure 6.8, only the iron nail that is
in contact with both water and air rusts. Therefore, rusting will only
occur in the presence of both water and oxygen. If one of the two
conditions is excluded, in one way or another, rusting will not take
place at all.
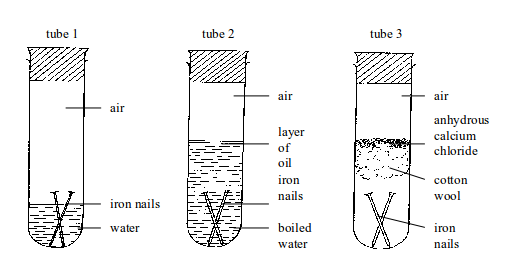
Testing for conditions necessary for iron rusting
Findings
Nails in tube 1 will rust. Nails in tubes 2 and 3 will not rust.
Reasons
In
tube 1, nails are in contact with both water and air (oxygen). In tube
2, the water has been boiled to expel the dissolved air. In addition,
any air above the water is prevented from dissolving in boiled water by a
layer of oil. So, the nails are completely shielded away from air.
Therefore, rusting is impossible. In tube 3, nails are in contact with
air only. The moisture present in air is absorbed by anhydrous calcium
chloride. Any moisture that might have been absorbed by the anhydrous
calcium chloride is prevented from reaching the nails by a tuft of
cotton wool. The cotton wool also absorbs some moisture directly from
the air. Therefore, tube 3 will always carry dry air (moisture-free
air). Hence, no rusting of iron nails occurs.
This
experiment demonstrates the fact that for iron to rust, both water and
air (oxygen) must be present. If one of these conditions is controlled,
no rusting can take place.
Similarity between rusting and burning
Chemically,
rusting and burning are similar processes in that they both require
oxygen. Consider the burning of magnesium to give magnesium oxide.
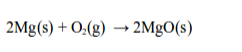
In this process, magnesium combines with the oxygen of the air to form magnesium oxide.
During rusting, iron combines with oxygen of the air in the presence of water to form brown hydrated iron (III) oxide, "rust."

In
addition, the two processes, burning and rusting, are exactly similar
in that they both generate heat. The only difference is in the time
required for each of the two processes to take place. During rusting
heat is given out, but without being noticed because of its slower rate
of production. Burning produces noticeable heat and light.
The Different Methods of Preventing Iron from Rustin
Describe the different methods of preventing iron from rusting
We
have learned that for iron to rust there must be direct contact between
the iron and both water and oxygen from the air. Therefore, in order to
stop rusting we must protect iron from either water (moisture) or
oxygen (air) or both. The following are some of the methods used to
prevent iron from rusting:
Painting
Painting
the iron article creates a waterproof and airproof cover over the
surface of the iron. This method is widespread for objects ranging in
size from ships and bridges to garden gates. Paints that contain lead or
zinc are mostly used. These paints are especially good for preventing
rusting. For example, "red lead" paints contain an oxide of lead,.
As
oxygen and water cannot reach the iron, it does not rust. However, if
the paint layer is scratched off rusting may occur. So, regular
repainting is necessary to keep this protection intact.
Oiling and greasing
The
oiling and/or greasing of the moving parts of machinery forms a
protective film, preventing rusting. Moving parts cannot be painted
since the paint layer can be easily scratched off during movement.
Again, the treatment must be repeated to continue the protection.
Plastic coating
Steel
is coated with plastic for use in garden chairs, refrigerators, bicycle
baskets, dish racks, etc. The plastic PVC (polyvinyl chloride), a trade
name for polychloroethene, is often used for this purpose. Plastic is
cheap and can be made to look attractive.
Electroplating
Electroplating
is the coating of one metal with a layer of another metal by means of
electrolysis, where the metal to be coated is the cathode and the
coating metal the anode.
An
iron or steel object can be electroplated with a layer of chromium or
tin to protect against rusting. A ‘tin can’ is made of steel coated on
both sides with a fine layer of tin. Tin is used because it is
unreactive and non-toxic. However, if protective layer is broken, then
the steel beneath will begin to rust. So, proper handling of tin-plated
items is needed.
Galvanizing
An iron object may be covered with a layer of zinc. This is called galvanizing.
Even if the zinc is scratched to expose the iron, the iron does not
rust. This is because zinc is higher in the reactivity series than iron.
So, zinc reacts with water and oxygen in preference to iron.
The
zinc layer can be applied by several different methods. These include
electroplating or dipping the object into molten zinc. When an iron or
steel article is dipped into molten zinc and then removed, it becomes
coated with a thin layer of zinc. The zinc forms a protective coat over
the surface of iron. This process is used for dustbins, car bodies,
barbed wires and motorway crash barriers.
Sacrificial protection
This
is a method of rust protection in which blocks of a metal more reactive
than iron are attached to the iron surface. Zinc and magnesium are more
reactive than iron. When blocks of zinc or magnesium are attached to
the hull of a steel ship or oil rig, it corrodes in preference to iron.
This is called sacrificial protection because the zinc or
magnesium is sacrificed to protect the iron. When the blocks are nearly
eaten away, they can be replaced by fresh blocks. Underground gas and
water pipes are connected by wire to blocks of magnesium to obtain the
same protection.
It
is not necessary to cover the whole surface of a steel article with the
more reactive metal for sacrificial protection to work. A ship may have
magnesium blocks riveted to its hull every few metres to prevent
rusting of the whole hull.
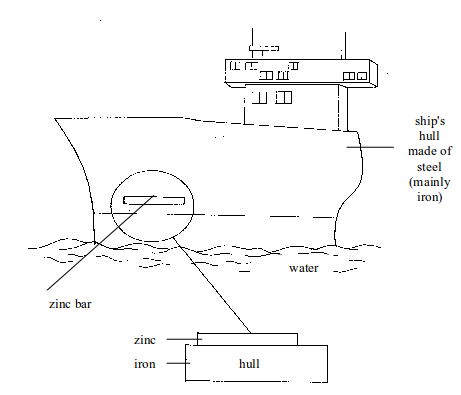
Blocks of zinc (or magnesium) attached to the hull of a ship
Alloying
Alloys
are mixtures of metals. For example, iron can be mixed with small
quantities of much less reactive metals to form an alloy called stainless steel.
Stainless steel contains iron mixed with chromium, nickel and
manganese. Stainless steel does not rust. It also has a very attractive
appearance. It is used to make cutlery and kitchen equipment.
Use of silica gel
Silica is a common name for silicon dioxide (SiO2).
Silica gel is a granular, vitreous, highly porous form of silica made
synthetically from sodium silicate. Despite its name, silica gel is a
solid. It is used as a desiccant, which absorbs moisture to prevent
rusting of iron items or articles. Most often, a small bag of silica gel
is put inside bags or boxes used for storing or carrying iron items to
absorb any moisture that may cause rusting.
Ndugu mwalimu/mwanafunzi kama unapata changamoto yoyote ile
kuhusu upatikanaji wa NOTES HIZI kwenye website hii, tafadhari wasiliana nasi kwa
simu no/hotline. 0759-104804 Paschal kabonge
barua pepe. paschalkabonge2@gmail.com
au andika maoni yako kwenye sehemu ya comment hapa chini ya post hii.
Kumbuka: mitihani yote inapatikana bureeee kabisa.
Asante.
ELIMU NI HAKI KWA WOTE.

1 Comments
Chemistry Form One Full Notes >>>>> Download Now
ReplyDelete>>>>> Download Full
Chemistry Form One Full Notes >>>>> Download LINK
>>>>> Download Now
Chemistry Form One Full Notes >>>>> Download Full
>>>>> Download LINK Sj